Showing 94 items matching ship no. 40
-
 Flagstaff Hill Maritime Museum and Village
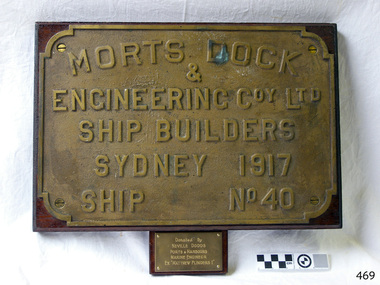
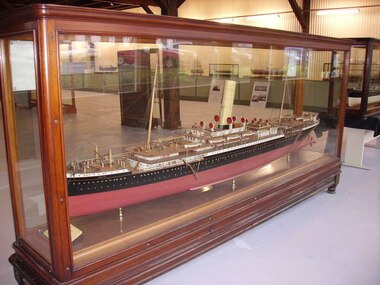
Plaque - Nameplate, Morts Dock & Engineering Co. Ltd, Matthew Flinders I, 1917
... Ship no. 40... & Engineering Coy. Ltd in Sydney, New South Wales. Identified as Ship... a vessel, the dredge Matthew Flinders I, ship no. 40, built.... / SHIP BUILDERS / SYDNEY 1917 / SHIP NO 40" On small plaque... Flinders I, ship no. 40, built by Morts Dock & Engineering Coy Ltd ...This nameplate was attached to the steel steamer Matthew Flinders I, a Suction Hopper Dredge used for pumping up sit and sanding from seabeds. It was donated by the Marine Engineer, Neville Dodds, from Ports and Harbours, from the Matthew Flinders I. The Matthew Flinders was constructed by Morts Dock & Engineering Coy. Ltd in Sydney, New South Wales. Identified as Ship No. 40, the dredge had twin screw engines that were made in Sydney. Its gross tonnage was 1180. It was launched on July 15th, 1916, and registered in 1917 at the Port of Melbourne by the owner, the Department of Public Works in Victoria. Unlike bucket dredges, the Matthew Flinders did not use permanent moorings but instead had bow and stern anchors. It travelled forward on the bow anchor, taking up a strip of even-depth wilt from the bed below. A local newspaper noted that the Matthew Flinders has many advantages that were especially useful for its work at Warrnambool. Warrnambool Harbour had been experiencing silting and sanding for many years. The problem continued even after the construction of the Breakwater in 1890, which was overseen by New Zealand engineer Arthur Dudley Dobson. Melbourne’s Department of Ports and Harbours sent the new Matthew Flinders to dredge the heavy silting in the Warrnambool Harbour in May 1919. This work was previously done by the smaller dredge, the Pioneer. However, after a month of work, the Matthew Flinders was returned to Melbourne for alterations to make it suitable for work in the heavy seas it experienced at Warrnambool. Both dredges were sent up from Melbourne when required over the years to periodically attend to the silting in the Harbour, but the Matthew Flinders was preferred because of its efficiency. It was still dredging the Harbour even in July 1938. The ship’s original master was J G Rosney. In February 1922 Percy Taylor from Ports and Harbours joined the Matthew Flinders as a Mate. 1923 the master in charge was Captain Dunbar. In August 1926 Percy Taylor was appointed as her Master and was later transferred to the Pioneer as Master in 1933. 1930 the dredges were no longer required as the Harbour was no longer suitable as a port. However, one source notes that the Matthew Flinders was still dredging the Harbour in 1938.This nameplate is significant for its association with the suction hopper dredge Matthew Flinders I, which was used to remove the build-up of silt and sand from the Warrnambool Harbour, allowing shipping activities to continue to operate in the Port of Warrnambool. The nameplate identifies the vessel and shows that it was built in Australia in the early 20th century for use within Australia. The need for dredging in the Warrnambool Harbour was a serious and ongoing problem, as silting continued to happen after a series of measures were taken to try and resolve the issue. Eventually, the Harbour could no longer function successfully as a port.Brass nameplate, rectangular with cut-away corners and moulded text, mounted with screws on timber. The plate is from a vessel, the dredge Matthew Flinders I, ship no. 40, built by Morts Dock & Engineering Coy Ltd in Sydney, and registered in 1917. A small rectangular engraved plaque below the nameplate gives further details of the ship and the donor.On nameplate: "MORTS DOCK / & / ENGINEERING COY. LTD. / SHIP BUILDERS / SYDNEY 1917 / SHIP NO 40" On small plaque: "Donated by / NEVILLE DODDS / PORTS & HARBOURS / MARINE ENGINEER / EX "MATTHEW FLINDERS I"flagstaff hill, warrnambool, maritime village, maritime museum, flagstaff hill maritime museum & village, shipwreck coast, great ocean road, dredge, mathew flinders i, steel steam ship, twin screw engines, nsw, state of victoria, suction hopper, public works melbourne, warrnambool harbour, lady bay, sanding, silting, breakwater, morts dock & engineering co ltd, captain dunbar, ship no. 40, niville dodds, ports & harbours, marine engineer, marine technology, ship relic, percy taylor, matthew flinders, pioneer -
 Flagstaff Hill Maritime Museum and Village
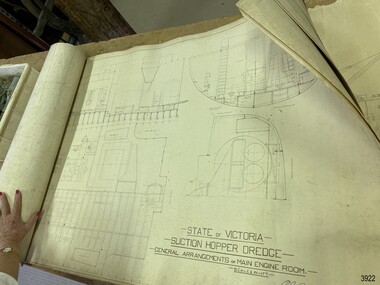
Plan - Vessel, Public Works Department (P.W.D.), Matthew Flinders I, 8-11-1911
... Ship No. 40.... Identified as Ship No. 40 by the ship builders, this dredge, had twin.... Identified as Ship No. 40 by the ship builders, this dredge, had twin ...These plans are line drawings by the State of Victoria for a Suction Hopper Dredge, which used a suction pump to bring up material from the bottom of a body of water. The plans are contained in a box from the Public Works Department, Ports and Harbours Division in Melbourne, which in the year 1910 was responsible for the dredging operations of coastal ports and harbours, and inland waterways. The stamped signature is that of Arthur Edward Cutler, Chief Engineer, Public Works Department of New South Wales. The steel steamer Matthew Flinders was constructed by Morts Dock & Engineering Co Ltd in Sydney, New South Wales. Identified as Ship No. 40 by the ship builders, this dredge, had twin screw engines that were made in Sydney. Its gross tonnage was 1180. It was launched on July 15th, 1916, and registered by the owner, Department of Public Works in Victoria, at the Port of Melbourne in 1917. Unlike bucket dredges, the Matthew Flinders did not use permanent moorings but instead had bow and stern anchors. It travelled forward on the bow anchor, taking up a strip of even-depth wilt from the bed below. A local newspaper noted that the Matthew Flinders has many advantages that were especially useful for its work at Warrnambool. Warrnambool Harbour had been experiencing silting and sanding for many years. The problem continued even after the construction of the Breakwater in 1890, which was overseen by New Zealand engineer Arthur Dudley Dobson. Melbourne’s Department of Ports and Harbours sent the new Matthew Flinders to dredge the heavy silting in the Warrnambool Harbour in May 1919. This work was previously done by the smaller dredge, the Pioneer. However, after a month of work, the Matthew Flinders was returned to Melbourne for alterations to make it suitable for work in the heavy seas it experienced at Warrnambool. Both dredges were sent up from Melbourne when required over the years to periodically attend to the silting in the Harbour, but the Matthew Flinders was preferred because of its efficiency. It was still dredging the Harbour even in July 1938. The ship’s original master was J G Rosney. In 1923 the master in charge was Captain Dunbar. In 1930 the dredges were no longer required as the Harbour was no longer suitable as port.These plans are significant for their close association with the suction hopper dredge, the Matthew Flinders I, which was call upon often to remove the silting of Warrnambool Harbour and allow shipping to continue in the Port of Warrnambool until 1930, when the Port of Warrnambool ceased to be suitable as a port. The work done by the Matthew Flinders is significant for its association with the Warrnambool Breakwater and the on-going issues with the silting of the Harbour. Plans with line drawings for the suction hopper dredge Matthew Flinders, rolled, in open-top wooden box. Created for the Public Works Department, Melbourne, Victoria. Stamped with signature and dated November I, 1911. Inscriptions: label on box, handwriting on box, drawings and outer layer of paper. Freighted by 1 Star, New Zealand Express Cargo.Signature stamp “A E Cutler” Date stamp “NOV 8 – 1911” Printed on one page “STATE OF VICTORIA / SUCTION HOPPER DREDGE / GENERAL ARRANGEMENTS OF MAIN ENGINE ROOM / SCALE 1/2 IN = 1 FT.” Label on box "1 [star symbol] / THE NEW ZEALA- - - / EXPRESS CAR - –“ Handwritten on base “PUBLIC WORKS / DEPARTMENT / - - LBOURNE” Handwritten in pencil on cover paper “MATTHEW Flinders”flagstaff hill, warrnambool, maritime village, maritime museum, flagstaff hill maritime museum & village, shipwreck coast, great ocean road, plan, line drawing, dredge, pioneer, steel steam ship, twin screw engines, a e cutler, arthur edward cutler, chief engineer, public works department, new south wales, nsw, 1911, state of victoria, suction hopper, main engine room, public works melbourne, warrnambool harbour, lady bay, sanding, silting, breakwater, morts dock & engineering co ltd, j g rosney, captain dunbar, ship no. 40, matthew flinders i, matthew flinders, 1 star, new zealand express cargo -
 Bendigo Military Museum
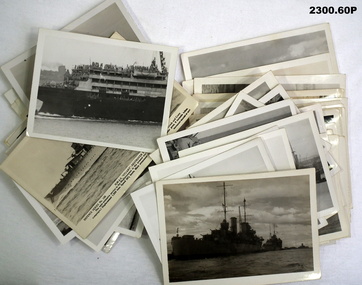
Photograph - PHOTOGRAPHS, NAVY WW2, c.WWII
... .38) Ship .39) Ship .40) Two ships at sea .41) Ship .42...) Submarine .37) Ship .38) Ship .39) Ship .40) Two ships at sea .41 ...Photographs collected by Earnest Albert Simmons W/2129 Royal Australian Navy. Enlisted 30 June 1941 and discharged 14 October 1946 with the rank of Leading Stoker. Posting at discharge was HMAS Lonsdale..1) Ship .2) Submarine conning tower .3) Ship .4) Hospital ship .5) Ship at anchor .6) Launch at ships side .7) Ships at anchor .8) Sunken ship .9) Ship .10) Group on launch .11) Ship firing a broadside .12) Wooden sailing vessel .13) Ship .14) Ship .15) Pilot station .16) Ship .17) Ship .18) Ship.s deck and biplane .19) Partially sunken ship .20) Two ships .21) Ship .22) Ship - damaged .23) Ship .24) Statue and colonade .25) Searchlights .26) Ships deck at sea .27) Aircraft .28) Ship .29) Ship .30) Troop ship .31) Swimmers at ships side .32) Ship .33) Ship .34) Ship deck at sea .35) Ship .36) Submarine .37) Ship .38) Ship .39) Ship .40) Two ships at sea .41) Ship .42) Aircraft carrier .43) Ships symbol .44) Sketch of Berbera .45) Sketch of biplanes .46) Boat at pier .47) Tug boat .48) Ship .49) Ship at wharf .50) Ships at wharf .51) Aircraft carrier .52) Ship .53) Ship at wharf .54) Ships at wharf .55) Ship .56) Two ships .57) Tug boat .58) Diagram comparing the size of two ships .59) Ship sailing past lighthouse .60) Postcard HMAS "Stuart". .1) Hobart and Glascow at Colombo .2) British submarine returning to Alexandria after claiming a victory - note Skull and X Bones .3) HMS Glascow at Colombo .4) Ex Italian hospital ship taken over by British. RAMB II .5) HMS Exeter .6) The landing party returning .7) Part fleet at Colombo .8) British ammunition ship sunk by sabotage in Alex Harbour .9) HMS Exeter .10) On the approach of the island. Note twin Lewis guns .11) HMS Ajax bombarding Bardia .12) A native boat used along coasts and Indian Ocean .13) RMS Georgie refoated at Pt? 1941 .14) HMS Carthage .15) Pilot station at Colombo .16) Aquitania .17) Ajax on patrol with Hobart and battle fleet .18) Hobart rolling in the Bight .19) HMS Gnat (river gun boat) hit by torpedo at Tobruk .20) - .21) Mauritania .22) Italian cruiser sunk by HMAS Sydney .23) Greek destroyer .24) Memorial of Mohomed Pasha Alexandria. Presented by Musso .25) Searchlight at Alexandria .26) Hobart pile driving in heavy weather .27) Lockheed Hudson dive bombing .28) - .29) HMS Galatea? x 1 turret at stern .30) Troops on Aquitania .31) Boys swimming in the middle lakes at Ismalia in the centre of Sues Canal .32) A water NG ? .33) - .34) Hobart striking heavy weather .35) HMS Jupiter .36) British submarine entering Alex .37) Queen Mary .38) Queen Elizabeth .39) Nieuw Amsterdam .40) - .41) Achilles .42) HMS Aircraft carrier - Illustrious .43) Symbol of Hobart's Pom-Pom .44) - .45) - .46) - .47) - .48) Mohoja and Oronties .49) Mohoja .50) - .51) - .52) HMAS Murchison 1954 .53) Strathmore .54) - .55) - .56 - .57 - .58) HMAS Vendetta .59) HMAS Cowra .60) - photographs, ran, hmas -
 The Beechworth Burke Museum
Audio - Oral History, Jennifer Williams, Fred and Bette Wyatt, 27 April 2000
Fred was born on the 1st of March 1928 and Bette in 1934, in Beechworth. Both of their families immigrated from England on convict ships in the 1800s. Fred and Bette both had large families of 9 and 5 siblings respectively, with 2 of Fred's siblings suffering from muscular dystrophy both dying at 20 years old which affected the family. Bette originally worked in multiple cafes and kitchens in Beechworth before working in "Ennals Store" which was a grocery store, for over 30 years. Fred worked as a milkman during the war before becoming an engineer at the tannery and the brewery in Beechworth. He rebuilt the factory at the brewery during the 1970s and worked there until he retired. This oral history recording was part of a project conducted by Jennifer Williams in the year 2000 to capture the everyday life and struggles in Beechworth during the twentieth century. This project involved recording seventy oral histories on cassette tapes of local Beechworth residents which were then published in a book titled: Listen to what they say: voices of twentieth century Beechworth. These cassette tapes were digitised in July 2021 with funds made available by the Friends of the Burke.Fred and Bette Wyatt's account of their lives in Beechworth and the local area during the 20th century is historically and socially significant to the cultural heritage of the region. They both mention important historical events and hardships in the region's history that had a lasting local, regional and national impact, including Australia during wartime, economic struggles, and the development of Beechworth town. This oral history account is socially and historically significant as it is a part of a broader collection of interviews conducted by Jennifer Williams which were published in the book 'Listen to what they say: voices of twentieth-century Beechworth.' While the township of Beechworth is known for its history as a gold rush town, these accounts provide a unique insight into the day-to-day life of the town's residents during the 20th century, many of which will have now been lost if they had not been preserved.This is a digital copy of a recording that was originally captured on a cassette tape. The cassette tape is black with a horizontal white strip and is currently stored in a clear flat plastic rectangular container. It holds up 40 minutes of recordings on each side.Fred and Bette Wyattbeechworth, beechworth tannery, beechworth brewery, fred and bette wyatt, wyatt, wyatt beechworth, ennals store, ennals beechworth, listen to what they say, burke museum -
 Mission to Seafarers Victoria
Journal (item) - Periodicals-Annual, Shiplovers' Society of Victoria, The Annual Dog Watch
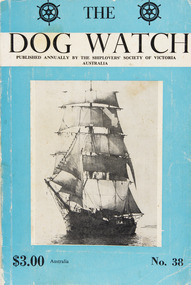
This journal provides the reader with glimpses of the adventures and hardships of a seaman's life. Many of the stories are of sailing ships.Contributes to our knowledge of the importance of shipping and places on record those stories of the sea which would otherwise be lost.Contents Foreword - Senator D. J. Hamer, D.S.C. - 5 Editorial - The Late Joyce M. B. Lambert - 7 Too Short A Life - S. A. E. Strom - 11 P & O's S.S. Canberra -- the Ship of the Falkland Islands War - Illingworth Mackay - 13 Charlie - R. N. Thiele - 31 Of Hobart and "Harriet" - Lloyd Holmes - 33 Our "Edina" - Alex Duffield - 40 At Sea in the "Rona" ("Poly Woodside') - Jack Land - 45 In Future, Rigging Climbing Only - Captain Laurie Gibson - 60 H.M.A.S. "Tingira" - Dudley Ricketts - 65 More than Just A list Of Names - E. Harper - 71 Christmas in a Convoy - Captain Fred Klebingat - 73 The Loss of S.S. "Accoma" A. E. R. & Captain P. J. Elsey - 89 Aboard "Beltana" in '55 - W. P/ Shemmeld - 91 From the Battle of Trafalgar - Lieut. G. W. Hooper, R.N. - 98 Letters from the Ship "Invincible" - Miss Janet Ronald - 100 The Exeter Maritime Museum - T. E. Goldfinch - 110 A Sailor's Diary - The Late J. B. Condor - 112 Book Reviews - - 124sailing ships, steamships, shipping, seafaring life, shiplovers' society of victoria, dog watch -
 Mission to Seafarers Victoria
Journal (item) - Periodicals-Annual, Shiplovers' Society of Victoria, The Annual Dog Watch
This journal provides the reader with glimpses of the adventures and hardships of a seaman's life. Many of the stories are of sailing ships.Contributes to our knowledge of the importance of shipping and places on record those stories of the sea which would otherwise be lost.Contents Foreword - D. Baillieu - 5 Editorial - S. A. E. Strom - 7 Figureheads - Captain G. Heyen - 13 The Polly Woodside - C. E. Bonwick - 15 The Sinking of A.U.S.N. Steamer "Macumba" - Captain J. D. V. Young - 16 The Real Hero of Quebec The Last Voyage of "Unicorn" Under the American Flag - D. Hannaford - 23 My Mother and Eva Carmichael - A. A. McArthur-Campbell - 30 The "Lauristan" -- Taltal to the Horn - R. W. Rudd - 34 A Sea-Water Mystery - Captain Leif Asklund - 38 Walking Backwards - T. Devaney - 40 Encounter With a Rum-Runner - Captain G. Chapman - 46 The Bosun - R. N. Thiele - 50 Crossing the Equator in a Ship's Boat - Captain Yuri Shemansky - 56 "Going Down the Bay" K. Bull - 59 Voyage in the Clipper "Yorkshire" in 1968 - R. Duruz - 62 A Dream Come True - W. P. Shemmeld - 64 The Mahogany Ship Mystery - J. M. Mackenzie - 68 Things Drake Never Did - E. Harper - 74 "Desdemona" - Captain D. Cowling - 76 A Naval Ploy - Revd. G. H. P. Karney - 90 Echoes of the Travelling Past - S. A. E. Strom - 91 Sail Training For Australia -- Now A Reality - R. Carter - 94 Northern Adventure -- The "Japan" - Captain H. O'May - 98 The Sea - Sire Robert Garran - 100 Voyage of the "Tillicum" - Captain H. W. Watson - 101 Sheepwash - Captain W. Eglen - 103 The Wreck of the "City of York" - E. M. Christie - 104 Wreck of the Barque "Eleanor Lancaster" - C. Dickson Gregory - 109 The Legend of Campbell Island - Captain H. O'May - 110 Book Reviews - 112sailing ships, steamships, shipping, seafaring life, shiplovers' society of victoria, dog watch -
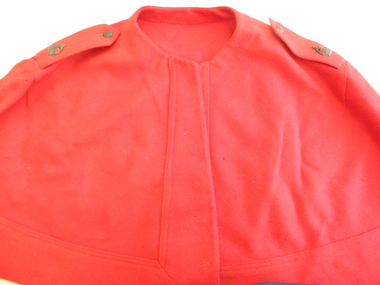 Geelong RSL Sub Branch
Nurses Cape V10909 Margaret A Brown, There are no makers marks, All items circa 1940
The Cape belonged to V10909 Margaret Annie Brown who served with the AMF during WW2. Margaret A Brown enlisted on 17 September 1940 and was discharged with the rank of Major on 28 July 1944. Margaret Brown worked at the Heidelberg Hospital and also as Matron at Puckapunyal. Margaret Brown missed out on a posting to Hospital Ships working in the Pacific because of her age at the time - 40 - the cut off for the assignment was 40. One of Margarets co-workers at Heidelberg Vivian Bullwinkle - late 20ish at the time - gained a posting oversees.This is the original Nurses Cape that belonged to V10909 Margaret A Brown. The Soldiers Paybook and Appointment Certificate are originals belonging to V10909 Margaret A Brown.A Scarlett Nurses Cape. There are two Major Badges of Rank on the epaulettes and two Australian Military Forces buttons holding the epaulettes to the shoulders. Soldiers Pay Book, Continuation. Cardboard Cover, buff colour with paper pages. Appointment Certificate. Paper.The are no inscriptions or markings on the Cape. Pay Book No C81010, Army No. V10909, Name Brown, Christian Names Margaret Anne.nurses cape, v10909 m a brown, ww2, heidelberg, puckpunyal, pay book, appointment certificate -
 Greensborough Historical Society
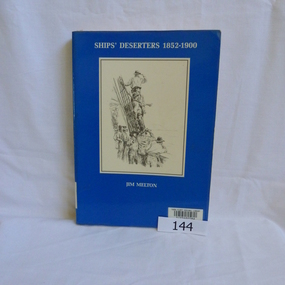
Book, Ships' deserters 1852-1900, 1852-1900
A record of known deserters from sailing ships 1852-1900.Useful for those undertaking family tree research.535 pages. Blue and white soft cover, library label on spine, covered in clear contact.Inside note in pencil "40 pages missing"deserters, gold rush, ships, australia immigration. -
 Federation University Historical Collection
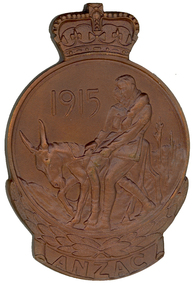
Medal - Numismatics, ANZAC Commemorative Medal for R.M. Serjeant, 1967
Robert M. Serjeant was the only son of Theo and Alice Serjeant, and grandson of famed mine manager Robert Malachy Serjeant (1829-1902). Robert Serjeant was a past student of the Ballarat School of Mines (SMB), and at the time of his World War One enlistment he had just finished an electrical course, and was working as a junior member of the SMB Department of Electricity. Robert Serjeant enlisted in December 1914. Corporal Serjeant (2138) of the 8th Battalion, died of wounds received in action at Gallipoli on 28 April 1915, aged 20. He was buried at sea and his name is listed at the Lone Pine Memorial. A brown paper parcel of Robert Serjeant's belongings was returned to his parents. It contained his discs, wrist-watch (damaged), notebook, hymn book and letters. [1] The Ballarat Courier reported: 'He was of quiet disposition, and a great student, devoting himself closely to his work.' Further information on R.M. Serjeant can be found at https://bih.federation.edu.au/index.php/Robert_M._Serjeant_Jnr The following statement on the ANZAC Commemorative Medallion and Badge was made by by Prime Minister Holt in 16 March 1967 when the Minister for Defence announced that it had been decided by the Australian Government, in consultation with the New Zealand Government, to issue a medallion and lapel badge to the veterans of the Gallipoli Campaign. "Last March, the Minister for Defence announced that it had been decided by the Australian Government, in consultation with the New Zealand Government, to issue a medallion and lapel badge to the veterans of the Gallipoli Campaign. I am glad to be able to announce that arrangements have now been completed for the production of the medallion and the badge. The Minister for the Army will be arranging distribution to those wishing to receive them as soon as possible. The Government hopes that production of the medallion and lapel badge will be sufficiently advanced to permit at least some of them to be distributed by ANZAC Day. The medallion (with the name of the recipient inscribed) will be issued to the surviving members of the Australian Defence Force who served on the Gallipoli Peninsula, or in direct support of the operations from close off-shore, at any time during the period from the first ANZAC Day in April, 1915 to the date of final evacuation in January, 1916. Next of kin or other entitled persons will be entitled to receive the medallion on behalf of their relatives, if the relative died on active service or has since died. For surviving members, a lapel badge will also be available for wearing. This will be a replica of the obverse (or front) of the medallion and will be about 1 inch high and 2/3 inch wide - the same size as the RSL badge. The medallion is the work of Mr. Raymond Ewers, the well-known Australian artist, based on a suggestion by Mr. Eric Garrett, a staff artist with the Department of the Army. It has been endorsed by both the Government of New Zealand and ourselves. It will be approximately 3 inches high and 2 inches wide. The obverse of the medallion depicts Simpson and his donkey carrying a wounded soldier to safety. It will be bordered on the lower half by a laurel wreath above the word ANZAC. The reverse (the back) shows a relief map of Australian and New Zealand superimposed by the Southern Cross. The lower half will be bordered by New Zealand fern leaves. The medallion will be cast in bronze and the lapel badge will be metal of a bronze colour. For the information of the honourable members I present also a brief statement setting out the conditions of eligibility which will apply to the medallion and badge and the manner in which those desiring to receive them should apply."(https://www.awm.gov.au/encyclopedia/anzac/medallion/doc.asp, accessed 26/02/2014) Conditions of eligibility. All members of the Australian Defence Force who served during the Gallipoli Campaign are entitled to receive the ANZAC Commemorative medallion. The campaign lasted from April 25, 1915 to January 8, 1916. The award will be made for service on the Gallipoli Peninsula and service in support of the operations in an area off-shore eastward of a line drawn from Yukyeri Point (lat 39 50' 40'' N long 26 9' 45'' E) through a point in lat 39 53' N long 26 0' E thence to Cape Gremea (lat 40 35' N long 26 6' E). The award will also be available to members of philanthropic organisations and the Press who were accredited to the AIF, and to Australian members of the crews of merchant ships or hospital ships which operated in direct support within the defined area. Note: The boundary line would run just off-shore from the land masses north and south of the Dardanelles, and is estimated to be within about 5 miles from the beach at ANZAC Cove. (https://www.awm.gov.au/encyclopedia/anzac/medallion/doc.asp, accessed 26/02/2014) This Item is significance because is was only issued to members of the Australian and New Zealand Defence Force who served at Gallipoli. This Medallion is significant because of its relationship to Robert M. Serjeant who died on 28 April 2015 at Gallipoli of wounds received in Action. Bronze commemorative medal in black presentation case showing Simpson and his donkey carrying a wounded soldier to safety. A crown is situated on top of the medal, and the word ANZAC beneath the medal. The opposite side depicts Australia, New Zealand and the Southern Cross Constellation. The lower half is bordered with New Zealand Fern leaves. The commemorative medal was presented to the family of Robert M. Serjeant. Gift of David Stevens, 2014.Engraved: "1238 R.M. Serjeant"serjeant, r.m. serjeant, robert m. sergeant, anzac, medal, numismatics -
 Seaworks Maritime Museum
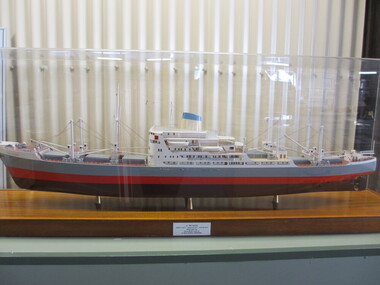
Shipbuilders Model, SS Omrah
The original ship was built in Glasgow in 1899 by Fairfield Shipbuilding and Engineering Co for the Orient Line. It was the largest Orient Line passenger ship completed in the nineteenth century and was the third vessel of the Line to bear the famous “O” prefix, which was traditional through to the last ship, the mighty 'Oriana'. Her dimensions were 8,130 gross tons, length 490.6ft x beam 56.6ft (149.50 x 17.22m). She had one funnel, two masts, twin screw and a speed of 18½ knots. Her maiden voyage from London, via Suez, to Melbourne and Sydney commenced on 3rd February 1899. She was the largest British flag ship sailing to Australia at the time and continued to regularly sail between London, Melbourne and Sydney throughout her life. She last sailed as a passenger ship between Melbourne and Sydney on the 3rd November 1916. During World War I, she was converted to a troopship and was used to transport soldiers and assist with military operations. She was torpedoed and sunk by German submarine UB-52, 40 nautical miles (74km) off the coast of Sardinia in the 12 May 1918. She was on her return journey from Alexandria to Marseilles with six other transports, carrying troops of the 52nd and 74th divisions when she was lost, resulting in one casualty. Her maiden voyage brought her to Melbourne in 1899. The ship carried the first Australian troops from Brisbane to WWI in September 1914.A large ship builder's model of the 'SS Omrah' an Orient Line one funnel passenger steamer of 1899. The model is displayed in a large glass and polished timber case on legs.2 Plaques at foot of model: "MODEL/ OF TWIN SCREW STEAMER/ "OMRAH"/ BUILT FOR/ ORIENT STEAM NAVIGATION CO LTD/ BY/ THE FAIRFIELD SHIPBUILDING & engineering CO LTD/ DIMENSIONS/ 507-0X56-9X37-6MLD/ GROSS TONNAGE 8291 TONS SPEED 18 1/2 KNOTS on boat: "OMRAH" -
 Seaworks Maritime Museum
Shipbuilders model, Tri Ellis
Model ship was presented to the Melbourne Maritime Museum by the British Phosphate Commissioners. Built as Tri-Ellis (1958-74), Tryphena (1974-78), Man Tat (1978-80), 1980 broken up. DWT 13,756 SPEED 14 KNOTS.AT 112RPM. BOILERS LARKSON TRIMBLETUBE. FUEL CONSUMPTION 7 TPD. GENERATORS W.H.ALLEN - 4CYL.2SA290/470. 480B.H.P.320L.W.-220V 333RPM DAILY CONS - 1.5 TONS. EMERGENCY GEN R & H. 40 K.N. -220V. REFRIGERATING MACH: J & G HALL LTD. SUPERSTRUCTURE: FORECASTLE 62'..2 DECKS RIVETED AND WELDED. CARGO BATTONS NOT FITTED. 9 BULKHEADS. RISE OF FLOOR 6".WATER BALLAST 3,296 TONS INCLUDING TUNNEL TANKS 1,341 TONS. 'TWEEN- DECKS FORWARD 274 TONS. REFRIGERATED CARGO INSTALLATION - 6 HOLDS - 55.2',52',54',59.5',43' ,53'. GRAIN CAPACITY :621,640 CU. FT. BALE CAPACITY : 573,810 CU. FT. INSULATED CAPACITY : 5,050 CU.FT. 6 STEEL HATCHWAYS (27',30',30'* 30') (30'* 27.75') (27', 24' * 28' ). 12 WINCHES...DERRICKS 1 (25), 2 (10), 10 (5). MACHINERY: OIL 2SA 7CY.C20 * 1400MM EXHAUST 470MM. 6500 BHP. FUEL BUNKERS: 2135 TONS HIGH VISCOCITY FUEL. The main engine was an opposed piston type Harland & Wolff 6-620/ 1870 6 for the number of cylinders.. 620 for the cylinder bore and 1870 for the combined strokes of the main exhaust pistons in each cylinder. This engine was based no a Burmeister and Wain design but H & W gave these engines their own type designation. Sailed on board its maiden voyage to Australia via Casablanca Morocco where she collected her first load of phosphate. We sailed to Geelong via the Suez canal and the Port of Aden (Yemen) and Freemantle. The first load of phosphate was unloaded at Corio Bay (geelong) Formerly part of the collection of Melbourne shipping company, Howard Smith Ltd. Ship builder's model of the cargo ship Tri-Ellis IMO 5368196 - Body of moulded polyurethane painted in red, black and grey, the deck painted in red, with detailed fittings, machinery, rigging and superstructure, raised on a wooden base. Original ship built Clyde 1958, 11,761 gross tonnes, 531.5' x 68' x 31' (162.0 x 20.73 x 9.45m)plaque at foot of model "MV TRI ELLIS/ LENGTH B.P. 486'-3"- BREADTH MLD 68'0" - DEPTH MLD 40'6"/ TONNAGE GROSS 11,760/ Built by HARLAND & WOLFF LTD/ For BRITISH PHOSPHATE COMMISSIONERS" On model "TRI-ELLIS" painted black -
 Seaworks Maritime Museum
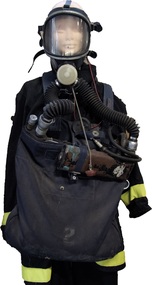
Firefighting jacket, re-breathing apparatus & air tank
Used for fighting ship fires in holds and accommodation. Air tank alone would supply 40 minutes of air, however, with the re-breathing apparatus, the wearer could get up to 2 hours of oxygen supply. Such apparatus were also used frequently in mining rescues. If the wearer found themselves trapped and immobile, they could decrease the rate of oxygen supply to provide for up to 12 hours.Black fire fighter jacket with yellow fluoro strips and blue with a black and white checkered lining (267.1). Ensemble also includes oxygen re-breather apparatus (267.2) and air tank (267.3).2/ MH TRUST 77/2/421 942/ Port of Melbourne Emerg S -
 Flagstaff Hill Maritime Museum and Village
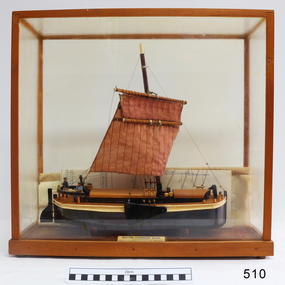
Craft - Ship model, 28-01-1985
This unnamed ship model was built by a Warrnambool resident. The Humber Keel design is typical sailing craft used for transport if inshore and inland cargo, from Humber and Hill, around Yorkshire, U.K. in late 19th and early 20th century. Ship model, single mast, double spar, humber keel. Two tone brown and cream paint, light brown sail. Figures of a man, woman and dog on deck. A type of vessel used on the Yorkshire waterways. Perspex case with wooden frame. Folded plans are inside case. Nameplate Plaque inside case describes ship."RIVER HUMBER KEEL/YORKSHIRE/LENGTH 61', BEAM 15'6", DR G CAP 100 TONS/CREW MAN & WIFE, SCALE 1:40/HUON PINE etc. E.H. GRANGER 28.1.1985" on plaque inside caseflagstaff hill, warrnambool, shipwrecked-coast, flagstaff-hill, flagstaff-hill-maritime-museum, maritime-museum, shipwreck-coast, flagstaff-hill-maritime-village, humber keel, sailing cargo -
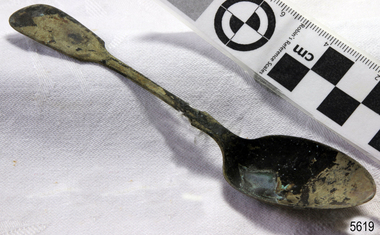 Flagstaff Hill Maritime Museum and Village
Spoon, circa 1878
This tea spoon is from the wreck of the LOCH ARD, a Loch Line ship of 1,693 tons which sailed from Gravesend, London, on 2 March 1878 with 17 passengers and a crew of 36 under Captain George Gibbs. “The intention was to discharge cargo in Melbourne, before returning to London via the Horn with wool and wheat”. Instead, on 1 June 1878, after 90 days at sea, she struck the sandstone cliffs of Mutton Bird Island on the south west coast of Victoria, and sank with the loss of 52 lives and all her cargo. The manifest of the LOCH ARD listed an array of manufactured goods and bulk metals being exported to the Colony of Victoria, with a declared value of £53,700. (202 bills of lading show an actual invoice value of £68, 456, with insurance underwriting to £30,000 of all cargo). Included in the manifest is the item of “Tin hardware & cutlery £7,530”. This teaspoon is one of 482 similar items of electro-plated cutlery from the LOCH ARD site, comprising spoons and forks of various sizes but all sharing the same general shape or design and metallic composition. 49 of these pieces display a legible makers’ mark — the initials “W” and “P” placed within a raised diamond outline, which is in turn contained within a sunken crown shape — identifying the manufacturer as William Page & Co of Birmingham. An electroplater’s makers’ marks, unlike sterling silver hallmarks, are not consistent identifiers of quality or date and place of manufacture. A similar line of five impressions was usually made to impress the consumer with an implication of industry standards, but what each one actually signified was not regulated and so they varied according to the whim of the individual foundry. In this case, the maker’s marks are often obscured by sedimentary accretion or removed by corrosion after a century of submersion in the ocean. However sufficient detail has survived to indicate that these samples of electro-plated cutlery probably originated from the same consignment in the LOCH ARD’s cargo. The following descriptions of maker’s marks are drawn from 255 tea spoons, 125 dessert spoons, and 99 table forks. These marks are clearly visible in 66 instances, while the same sequence of general outlines, or depression shapes, is discernible in another 166 examples. 1. A recessed Crown containing a raised Diamond outline and the initials “W” and “P” (the recognised trademark of William Page & Co) 2. An impressed Ellipse containing a raised, pivoted, Triangle in its lower part and bearing a Resurrection Cross on its upper section (a possible dissenting church symbol reflecting religious affiliation); OR a rounded Square impression containing a raised, ‘lazy’, letter “B” (possibly mimicking sterling silver hallmark signifying city of manufacture i.e. Birmingham) 3. An impressed rounded Square filled with a raised Maltese Cross (the base metal composite of nickel silver was also known as ‘German silver’ after its Berlin inventors in 1823) 4. A recessed Circle containing a Crab or Scarab Beetle image; OR a recessed Circle containing a rotated ‘fleur de lys’ or ‘fasces’ design 5. A depressed Diamond shape enclosing a large raised letter “R” and a small raised letter “D” (mimicking the U.K. Patent Office stamp which abbreviated the term ‘registered’ to “RD”, but also included date and class of patent) Suggested trade names for William Page & Co’s particular blend of brass plating are ‘roman silver’ or ‘silverite’. This copper alloy polishes to a lustrous gold when new, discolouring to a murky grey with greenish hue when neglected. HISTORY OF THE LOCH ARD The LOCH ARD belonged to the famous Loch Line which sailed many ships from England to Australia. Built in Glasgow by Barclay, Curdle and Co. in 1873, the LOCH ARD was a three-masted square rigged iron sailing ship. The ship measured 262ft 7" (79.87m) in length, 38ft (11.58m) in width, 23ft (7m) in depth and had a gross tonnage of 1693 tons. The LOCH ARD's main mast measured a massive 150ft (45.7m) in height. LOCH ARD made three trips to Australia and one trip to Calcutta before its final voyage. LOCH ARD left England on March 2, 1878, under the command of Captain Gibbs, a newly married, 29 year old. She was bound for Melbourne with a crew of 37, plus 17 passengers and a load of cargo. The general cargo reflected the affluence of Melbourne at the time. On board were straw hats, umbrella, perfumes, clay pipes, pianos, clocks, confectionary, linen and candles, as well as a heavier load of railway irons, cement, lead and copper. There were items included that intended for display in the Melbourne International Exhibition in 1880. The voyage to Port Phillip was long but uneventful. At 3am on June 1, 1878, Captain Gibbs was expecting to see land and the passengers were becoming excited as they prepared to view their new homeland in the early morning. But LOCH ARD was running into a fog which greatly reduced visibility. Captain Gibbs was becoming anxious as there was no sign of land or the Cape Otway lighthouse. At 4am the fog lifted. A man aloft announced that he could see breakers. The sheer cliffs of Victoria's west coast came into view, and Captain Gibbs realised that the ship was much closer to them than expected. He ordered as much sail to be set as time would permit and then attempted to steer the vessel out to sea. On coming head on into the wind, the ship lost momentum, the sails fell limp and LOCH ARD's bow swung back. Gibbs then ordered the anchors to be released in an attempt to hold its position. The anchors sank some 50 fathoms - but did not hold. By this time LOCH ARD was among the breakers and the tall cliffs of Mutton Bird Island rose behind the ship. Just half a mile from the coast, the ship's bow was suddenly pulled around by the anchor. The captain tried to tack out to sea, but the ship struck a reef at the base of Mutton Bird Island, near Port Campbell. Waves broke over the ship and the top deck was loosened from the hull. The masts and rigging came crashing down knocking passengers and crew overboard. When a lifeboat was finally launched, it crashed into the side of LOCH ARD and capsized. Tom Pearce, who had launched the boat, managed to cling to its overturned hull and shelter beneath it. He drifted out to sea and then on the flood tide came into what is now known as LOCH ARD Gorge. He swam to shore, bruised and dazed, and found a cave in which to shelter. Some of the crew stayed below deck to shelter from the falling rigging but drowned when the ship slipped off the reef into deeper water. Eva Carmichael had raced onto deck to find out what was happening only to be confronted by towering cliffs looming above the stricken ship. In all the chaos, Captain Gibbs grabbed Eva and said, "If you are saved Eva, let my dear wife know that I died like a sailor". That was the last Eva Carmichael saw of the captain. She was swept off the ship by a huge wave. Eva saw Tom Pearce on a small rocky beach and yelled to attract his attention. He dived in and swam to the exhausted woman and dragged her to shore. He took her to the cave and broke open case of brandy which had washed up on the beach. He opened a bottle to revive the unconscious woman. A few hours later Tom scaled a cliff in search of help. He followed hoof prints and came by chance upon two men from nearby Glenample Station three and a half miles away. In a state of exhaustion, he told the men of the tragedy. Tom returned to the gorge while the two men rode back to the station to get help. By the time they reached LOCH ARD Gorge, it was cold and dark. The two shipwreck survivors were taken to Glenample Station to recover. Eva stayed at the station for six weeks before returning to Ireland, this time by steamship. In Melbourne, Tom Pearce received a hero's welcome. He was presented with the first gold medal of the Royal Humane Society of Victoria and a £1000 cheque from the Victorian Government. Concerts were performed to honour the young man's bravery and to raise money for those who lost family in the LOCH ARD disaster. Of the 54 crew members and passengers on board, only two survived: the apprentice, Tom Pearce and the young woman passenger, Eva Carmichael, who lost all of her family in the tragedy. Ten days after the LOCH ARD tragedy, salvage rights to the wreck were sold at auction for £2,120. Cargo valued at £3,000 was salvaged and placed on the beach, but most washed back into the sea when another storm developed. The wreck of LOCH ARD still lies at the base of Mutton Bird Island. Much of the cargo has now been salvaged and some was washed up into what is now known as LOCH ARD Gorge. Cargo and artefacts have also been illegally salvaged over many years before protective legislation was introduced. One of the most unlikely pieces of cargo to have survived the shipwreck was a Minton porcelain peacock - one of only nine in the world. The peacock was destined for the Melbourne International Exhibition in 1880. It had been well packed, which gave it adequate protection during the violent storm. Today, the Minton peacock can be seen at the Flagstaff Hill Maritime Museum in Warrnambool. From Australia's most dramatic shipwreck it has now become Australia's most valuable shipwreck artefact and is one of very few 'objects' on the Victorian State Heritage Register. The LOCH ARD shipwreck is of State significance – Victorian Heritage Register S 417. Flagstaff Hill’s collection of artefacts from LOCH ARD is significant for being one of the largest collections of artefacts from this shipwreck in Victoria. It is significant for its association with the shipwreck, which is on the Victorian Heritage Register (VHR S417). The collection is significant because of the relationship between the objects, as together they have a high potential to interpret the story of the LOCH ARD. The LOCH ARD collection is archaeologically significant as the remains of a large international passenger and cargo ship. The LOCH ARD collection is historically significant for representing aspects of Victoria’s shipping history and its potential to interpret sub-theme 1.5 of Victoria’s Framework of Historical Themes (living with natural processes). The collection is also historically significant for its association with the LOCH ARD, which was one of the worst and best known shipwrecks in Victoria’s history. Unrestored tea spoon from the wreck of the LOCH ARD. The spoon design has a flattened fiddle-back handle, with a thin stem or shank, flared collar, and elongated bowl. The spoons metallic composition is a thin layer of brass alloy which has partially corroded back to a nickel-silver base metal. The spoon has 40% of plate remaining and 10% of surface covered by congealed packing paper. No visible makers marks.flagstaff hill, warrnambool, shipwrecked coast, flagstaff hill maritime museum, maritime museum, shipwreck coast, flagstaff hill maritime village, great ocean road, loch line, loch ard, captain gibbs, eva carmichael, tom pearce, glenample station, mutton bird island, loch ard gorge, electroplated cutlery, loch ard shipwreck, nickel silver, william page & co, birmingham, brass plating, makers marks -
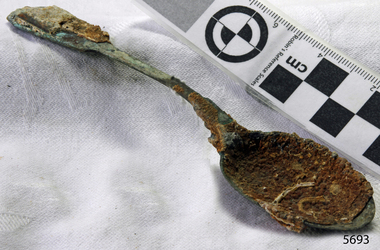
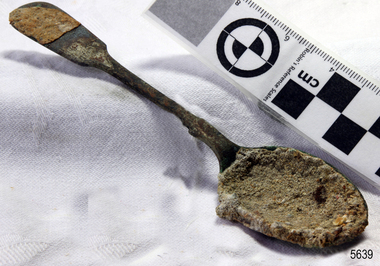 Flagstaff Hill Maritime Museum and Village
Spoon, circa 1878
This tea spoon is from the wreck of the LOCH ARD, a Loch Line ship of 1,693 tons which sailed from Gravesend, London, on 2 March 1878 with 17 passengers and a crew of 36 under Captain George Gibbs. “The intention was to discharge cargo in Melbourne, before returning to London via the Horn with wool and wheat”. Instead, on 1 June 1878, after 90 days at sea, she struck the sandstone cliffs of Mutton Bird Island on the south west coast of Victoria, and sank with the loss of 52 lives and all her cargo. The manifest of the LOCH ARD listed an array of manufactured goods and bulk metals being exported to the Colony of Victoria, with a declared value of £53,700. (202 bills of lading show an actual invoice value of £68, 456, with insurance underwriting to £30,000 of all cargo). Included in the manifest is the item of “Tin hardware & cutlery £7,530”. This teaspoon is one of 482 similar items of electro-plated cutlery from the LOCH ARD site, comprising spoons and forks of various sizes but all sharing the same general shape or design and metallic composition. 49 of these pieces display a legible makers’ mark — the initials “W” and “P” placed within a raised diamond outline, which is in turn contained within a sunken crown shape — identifying the manufacturer as William Page & Co of Birmingham. An electroplater’s makers’ marks, unlike sterling silver hallmarks, are not consistent identifiers of quality or date and place of manufacture. A similar line of five impressions was usually made to impress the consumer with an implication of industry standards, but what each one actually signified was not regulated and so they varied according to the whim of the individual foundry. In this case, the maker’s marks are often obscured by sedimentary accretion or removed by corrosion after a century of submersion in the ocean. However sufficient detail has survived to indicate that these samples of electro-plated cutlery probably originated from the same consignment in the LOCH ARD’s cargo. The following descriptions of maker’s marks are drawn from 255 tea spoons, 125 dessert spoons, and 99 table forks. These marks are clearly visible in 66 instances, while the same sequence of general outlines, or depression shapes, is discernible in another 166 examples. 1. A recessed Crown containing a raised Diamond outline and the initials “W” and “P” (the recognised trademark of William Page & Co) 2. An impressed Ellipse containing a raised, pivoted, Triangle in its lower part and bearing a Resurrection Cross on its upper section (a possible dissenting church symbol reflecting religious affiliation); OR a rounded Square impression containing a raised, ‘lazy’, letter “B” (possibly mimicking sterling silver hallmark signifying city of manufacture i.e. Birmingham) 3. An impressed rounded Square filled with a raised Maltese Cross (the base metal composite of nickel silver was also known as ‘German silver’ after its Berlin inventors in 1823) 4. A recessed Circle containing a Crab or Scarab Beetle image; OR a recessed Circle containing a rotated ‘fleur de lys’ or ‘fasces’ design 5. A depressed Diamond shape enclosing a large raised letter “R” and a small raised letter “D” (mimicking the U.K. Patent Office stamp which abbreviated the term ‘registered’ to “RD”, but also included date and class of patent) Suggested trade names for William Page & Co’s particular blend of brass plating are ‘roman silver’ or ‘silverite’. This copper alloy polishes to a lustrous gold when new, discolouring to a murky grey with greenish hue when neglected. HISTORY OF THE LOCH ARD The LOCH ARD belonged to the famous Loch Line which sailed many ships from England to Australia. Built in Glasgow by Barclay, Curdle and Co. in 1873, the LOCH ARD was a three-masted square rigged iron sailing ship. The ship measured 262ft 7" (79.87m) in length, 38ft (11.58m) in width, 23ft (7m) in depth and had a gross tonnage of 1693 tons. The LOCH ARD's main mast measured a massive 150ft (45.7m) in height. LOCH ARD made three trips to Australia and one trip to Calcutta before its final voyage. LOCH ARD left England on March 2, 1878, under the command of Captain Gibbs, a newly married, 29 year old. She was bound for Melbourne with a crew of 37, plus 17 passengers and a load of cargo. The general cargo reflected the affluence of Melbourne at the time. On board were straw hats, umbrella, perfumes, clay pipes, pianos, clocks, confectionary, linen and candles, as well as a heavier load of railway irons, cement, lead and copper. There were items included that intended for display in the Melbourne International Exhibition in 1880. The voyage to Port Phillip was long but uneventful. At 3am on June 1, 1878, Captain Gibbs was expecting to see land and the passengers were becoming excited as they prepared to view their new homeland in the early morning. But LOCH ARD was running into a fog which greatly reduced visibility. Captain Gibbs was becoming anxious as there was no sign of land or the Cape Otway lighthouse. At 4am the fog lifted. A man aloft announced that he could see breakers. The sheer cliffs of Victoria's west coast came into view, and Captain Gibbs realised that the ship was much closer to them than expected. He ordered as much sail to be set as time would permit and then attempted to steer the vessel out to sea. On coming head on into the wind, the ship lost momentum, the sails fell limp and LOCH ARD's bow swung back. Gibbs then ordered the anchors to be released in an attempt to hold its position. The anchors sank some 50 fathoms - but did not hold. By this time LOCH ARD was among the breakers and the tall cliffs of Mutton Bird Island rose behind the ship. Just half a mile from the coast, the ship's bow was suddenly pulled around by the anchor. The captain tried to tack out to sea, but the ship struck a reef at the base of Mutton Bird Island, near Port Campbell. Waves broke over the ship and the top deck was loosened from the hull. The masts and rigging came crashing down knocking passengers and crew overboard. When a lifeboat was finally launched, it crashed into the side of LOCH ARD and capsized. Tom Pearce, who had launched the boat, managed to cling to its overturned hull and shelter beneath it. He drifted out to sea and then on the flood tide came into what is now known as LOCH ARD Gorge. He swam to shore, bruised and dazed, and found a cave in which to shelter. Some of the crew stayed below deck to shelter from the falling rigging but drowned when the ship slipped off the reef into deeper water. Eva Carmichael had raced onto deck to find out what was happening only to be confronted by towering cliffs looming above the stricken ship. In all the chaos, Captain Gibbs grabbed Eva and said, "If you are saved Eva, let my dear wife know that I died like a sailor". That was the last Eva Carmichael saw of the captain. She was swept off the ship by a huge wave. Eva saw Tom Pearce on a small rocky beach and yelled to attract his attention. He dived in and swam to the exhausted woman and dragged her to shore. He took her to the cave and broke open case of brandy which had washed up on the beach. He opened a bottle to revive the unconscious woman. A few hours later Tom scaled a cliff in search of help. He followed hoof prints and came by chance upon two men from nearby Glenample Station three and a half miles away. In a state of exhaustion, he told the men of the tragedy. Tom returned to the gorge while the two men rode back to the station to get help. By the time they reached LOCH ARD Gorge, it was cold and dark. The two shipwreck survivors were taken to Glenample Station to recover. Eva stayed at the station for six weeks before returning to Ireland, this time by steamship. In Melbourne, Tom Pearce received a hero's welcome. He was presented with the first gold medal of the Royal Humane Society of Victoria and a £1000 cheque from the Victorian Government. Concerts were performed to honour the young man's bravery and to raise money for those who lost family in the LOCH ARD disaster. Of the 54 crew members and passengers on board, only two survived: the apprentice, Tom Pearce and the young woman passenger, Eva Carmichael, who lost all of her family in the tragedy. Ten days after the LOCH ARD tragedy, salvage rights to the wreck were sold at auction for £2,120. Cargo valued at £3,000 was salvaged and placed on the beach, but most washed back into the sea when another storm developed. The wreck of LOCH ARD still lies at the base of Mutton Bird Island. Much of the cargo has now been salvaged and some was washed up into what is now known as LOCH ARD Gorge. Cargo and artefacts have also been illegally salvaged over many years before protective legislation was introduced. One of the most unlikely pieces of cargo to have survived the shipwreck was a Minton porcelain peacock - one of only nine in the world. The peacock was destined for the Melbourne International Exhibition in 1880. It had been well packed, which gave it adequate protection during the violent storm. Today, the Minton peacock can be seen at the Flagstaff Hill Maritime Museum in Warrnambool. From Australia's most dramatic shipwreck it has now become Australia's most valuable shipwreck artefact and is one of very few 'objects' on the Victorian State Heritage Register. The LOCH ARD shipwreck is of State significance – Victorian Heritage Register S 417. Flagstaff Hill’s collection of artefacts from LOCH ARD is significant for being one of the largest collections of artefacts from this shipwreck in Victoria. It is significant for its association with the shipwreck, which is on the Victorian Heritage Register (VHR S417). The collection is significant because of the relationship between the objects, as together they have a high potential to interpret the story of the LOCH ARD. The LOCH ARD collection is archaeologically significant as the remains of a large international passenger and cargo ship. The LOCH ARD collection is historically significant for representing aspects of Victoria’s shipping history and its potential to interpret sub-theme 1.5 of Victoria’s Framework of Historical Themes (living with natural processes). The collection is also historically significant for its association with the LOCH ARD, which was one of the worst and best known shipwrecks in Victoria’s history. Unrestored tea spoon from the wreck of the LOCH ARD. The spoon design has a flattened fiddle-back handle, with a thin stem or shank, flared collar, and elongated bowl. The spoons metallic composition is a thin layer of brass alloy which has partially corroded back to a nickel-silver base metal. 40% concreted sediment on bowl and handle. Only 10% of plate remaining with 10% verdigris.flagstaff hill, warrnambool, shipwrecked coast, flagstaff hill maritime museum, maritime museum, shipwreck coast, flagstaff hill maritime village, great ocean road, loch line, loch ard, captain gibbs, eva carmichael, tom pearce, glenample station, mutton bird island, loch ard gorge, electroplated cutlery, loch ard shipwreck, nickel silver, william page & co, birmingham, brass plating, makers marks -
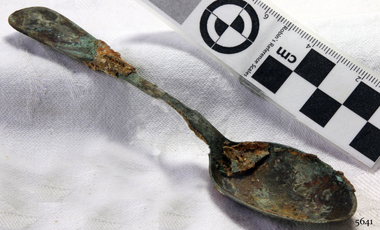 Flagstaff Hill Maritime Museum and Village
Spoon, circa 1878
This tea spoon is from the wreck of the LOCH ARD, a Loch Line ship of 1,693 tons which sailed from Gravesend, London, on 2 March 1878 with 17 passengers and a crew of 36 under Captain George Gibbs. “The intention was to discharge cargo in Melbourne, before returning to London via the Horn with wool and wheat”. Instead, on 1 June 1878, after 90 days at sea, she struck the sandstone cliffs of Mutton Bird Island on the south west coast of Victoria, and sank with the loss of 52 lives and all her cargo. The manifest of the LOCH ARD listed an array of manufactured goods and bulk metals being exported to the Colony of Victoria, with a declared value of £53,700. (202 bills of lading show an actual invoice value of £68, 456, with insurance underwriting to £30,000 of all cargo). Included in the manifest is the item of “Tin hardware & cutlery £7,530”. This teaspoon is one of 482 similar items of electro-plated cutlery from the LOCH ARD site, comprising spoons and forks of various sizes but all sharing the same general shape or design and metallic composition. 49 of these pieces display a legible makers’ mark — the initials “W” and “P” placed within a raised diamond outline, which is in turn contained within a sunken crown shape — identifying the manufacturer as William Page & Co of Birmingham. An electroplater’s makers’ marks, unlike sterling silver hallmarks, are not consistent identifiers of quality or date and place of manufacture. A similar line of five impressions was usually made to impress the consumer with an implication of industry standards, but what each one actually signified was not regulated and so they varied according to the whim of the individual foundry. In this case, the maker’s marks are often obscured by sedimentary accretion or removed by corrosion after a century of submersion in the ocean. However sufficient detail has survived to indicate that these samples of electro-plated cutlery probably originated from the same consignment in the LOCH ARD’s cargo. The following descriptions of maker’s marks are drawn from 255 tea spoons, 125 dessert spoons, and 99 table forks. These marks are clearly visible in 66 instances, while the same sequence of general outlines, or depression shapes, is discernible in another 166 examples. 1. A recessed Crown containing a raised Diamond outline and the initials “W” and “P” (the recognised trademark of William Page & Co) 2. An impressed Ellipse containing a raised, pivoted, Triangle in its lower part and bearing a Resurrection Cross on its upper section (a possible dissenting church symbol reflecting religious affiliation); OR a rounded Square impression containing a raised, ‘lazy’, letter “B” (possibly mimicking sterling silver hallmark signifying city of manufacture i.e. Birmingham) 3. An impressed rounded Square filled with a raised Maltese Cross (the base metal composite of nickel silver was also known as ‘German silver’ after its Berlin inventors in 1823) 4. A recessed Circle containing a Crab or Scarab Beetle image; OR a recessed Circle containing a rotated ‘fleur de lys’ or ‘fasces’ design 5. A depressed Diamond shape enclosing a large raised letter “R” and a small raised letter “D” (mimicking the U.K. Patent Office stamp which abbreviated the term ‘registered’ to “RD”, but also included date and class of patent) Suggested trade names for William Page & Co’s particular blend of brass plating are ‘roman silver’ or ‘silverite’. This copper alloy polishes to a lustrous gold when new, discolouring to a murky grey with greenish hue when neglected. HISTORY OF THE LOCH ARD The LOCH ARD belonged to the famous Loch Line which sailed many ships from England to Australia. Built in Glasgow by Barclay, Curdle and Co. in 1873, the LOCH ARD was a three-masted square rigged iron sailing ship. The ship measured 262ft 7" (79.87m) in length, 38ft (11.58m) in width, 23ft (7m) in depth and had a gross tonnage of 1693 tons. The LOCH ARD's main mast measured a massive 150ft (45.7m) in height. LOCH ARD made three trips to Australia and one trip to Calcutta before its final voyage. LOCH ARD left England on March 2, 1878, under the command of Captain Gibbs, a newly married, 29 year old. She was bound for Melbourne with a crew of 37, plus 17 passengers and a load of cargo. The general cargo reflected the affluence of Melbourne at the time. On board were straw hats, umbrella, perfumes, clay pipes, pianos, clocks, confectionary, linen and candles, as well as a heavier load of railway irons, cement, lead and copper. There were items included that intended for display in the Melbourne International Exhibition in 1880. The voyage to Port Phillip was long but uneventful. At 3am on June 1, 1878, Captain Gibbs was expecting to see land and the passengers were becoming excited as they prepared to view their new homeland in the early morning. But LOCH ARD was running into a fog which greatly reduced visibility. Captain Gibbs was becoming anxious as there was no sign of land or the Cape Otway lighthouse. At 4am the fog lifted. A man aloft announced that he could see breakers. The sheer cliffs of Victoria's west coast came into view, and Captain Gibbs realised that the ship was much closer to them than expected. He ordered as much sail to be set as time would permit and then attempted to steer the vessel out to sea. On coming head on into the wind, the ship lost momentum, the sails fell limp and LOCH ARD's bow swung back. Gibbs then ordered the anchors to be released in an attempt to hold its position. The anchors sank some 50 fathoms - but did not hold. By this time LOCH ARD was among the breakers and the tall cliffs of Mutton Bird Island rose behind the ship. Just half a mile from the coast, the ship's bow was suddenly pulled around by the anchor. The captain tried to tack out to sea, but the ship struck a reef at the base of Mutton Bird Island, near Port Campbell. Waves broke over the ship and the top deck was loosened from the hull. The masts and rigging came crashing down knocking passengers and crew overboard. When a lifeboat was finally launched, it crashed into the side of LOCH ARD and capsized. Tom Pearce, who had launched the boat, managed to cling to its overturned hull and shelter beneath it. He drifted out to sea and then on the flood tide came into what is now known as LOCH ARD Gorge. He swam to shore, bruised and dazed, and found a cave in which to shelter. Some of the crew stayed below deck to shelter from the falling rigging but drowned when the ship slipped off the reef into deeper water. Eva Carmichael had raced onto deck to find out what was happening only to be confronted by towering cliffs looming above the stricken ship. In all the chaos, Captain Gibbs grabbed Eva and said, "If you are saved Eva, let my dear wife know that I died like a sailor". That was the last Eva Carmichael saw of the captain. She was swept off the ship by a huge wave. Eva saw Tom Pearce on a small rocky beach and yelled to attract his attention. He dived in and swam to the exhausted woman and dragged her to shore. He took her to the cave and broke open case of brandy which had washed up on the beach. He opened a bottle to revive the unconscious woman. A few hours later Tom scaled a cliff in search of help. He followed hoof prints and came by chance upon two men from nearby Glenample Station three and a half miles away. In a state of exhaustion, he told the men of the tragedy. Tom returned to the gorge while the two men rode back to the station to get help. By the time they reached LOCH ARD Gorge, it was cold and dark. The two shipwreck survivors were taken to Glenample Station to recover. Eva stayed at the station for six weeks before returning to Ireland, this time by steamship. In Melbourne, Tom Pearce received a hero's welcome. He was presented with the first gold medal of the Royal Humane Society of Victoria and a £1000 cheque from the Victorian Government. Concerts were performed to honour the young man's bravery and to raise money for those who lost family in the LOCH ARD disaster. Of the 54 crew members and passengers on board, only two survived: the apprentice, Tom Pearce and the young woman passenger, Eva Carmichael, who lost all of her family in the tragedy. Ten days after the LOCH ARD tragedy, salvage rights to the wreck were sold at auction for £2,120. Cargo valued at £3,000 was salvaged and placed on the beach, but most washed back into the sea when another storm developed. The wreck of LOCH ARD still lies at the base of Mutton Bird Island. Much of the cargo has now been salvaged and some was washed up into what is now known as LOCH ARD Gorge. Cargo and artefacts have also been illegally salvaged over many years before protective legislation was introduced. One of the most unlikely pieces of cargo to have survived the shipwreck was a Minton porcelain peacock - one of only nine in the world. The peacock was destined for the Melbourne International Exhibition in 1880. It had been well packed, which gave it adequate protection during the violent storm. Today, the Minton peacock can be seen at the Flagstaff Hill Maritime Museum in Warrnambool. From Australia's most dramatic shipwreck it has now become Australia's most valuable shipwreck artefact and is one of very few 'objects' on the Victorian State Heritage Register. The LOCH ARD shipwreck is of State significance – Victorian Heritage Register S 417. Flagstaff Hill’s collection of artefacts from LOCH ARD is significant for being one of the largest collections of artefacts from this shipwreck in Victoria. It is significant for its association with the shipwreck, which is on the Victorian Heritage Register (VHR S417). The collection is significant because of the relationship between the objects, as together they have a high potential to interpret the story of the LOCH ARD. The LOCH ARD collection is archaeologically significant as the remains of a large international passenger and cargo ship. The LOCH ARD collection is historically significant for representing aspects of Victoria’s shipping history and its potential to interpret sub-theme 1.5 of Victoria’s Framework of Historical Themes (living with natural processes). The collection is also historically significant for its association with the LOCH ARD, which was one of the worst and best known shipwrecks in Victoria’s history. Unrestored tea spoon from the wreck of the LOCH ARD. The spoon design has a flattened fiddle-back handle, with a thin stem or shank, flared collar, and elongated bowl. The spoons metallic composition is a thin layer of brass alloy which has partially corroded back to a nickel-silver base metal. 40% of surface is covered with sediment. Balance is dark red with quantity of aqua-marine verdigris.flagstaff hill, warrnambool, shipwrecked coast, flagstaff hill maritime museum, maritime museum, shipwreck coast, flagstaff hill maritime village, great ocean road, loch line, loch ard, captain gibbs, eva carmichael, tom pearce, glenample station, mutton bird island, loch ard gorge, electroplated cutlery, loch ard shipwreck, nickel silver, william page & co, birmingham, brass plating, makers marks -
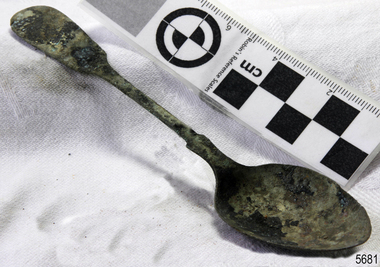 Flagstaff Hill Maritime Museum and Village
Spoon, circa 1878
This tea spoon is from the wreck of the LOCH ARD, a Loch Line ship of 1,693 tons which sailed from Gravesend, London, on 2 March 1878 with 17 passengers and a crew of 36 under Captain George Gibbs. “The intention was to discharge cargo in Melbourne, before returning to London via the Horn with wool and wheat”. Instead, on 1 June 1878, after 90 days at sea, she struck the sandstone cliffs of Mutton Bird Island on the south west coast of Victoria, and sank with the loss of 52 lives and all her cargo. The manifest of the LOCH ARD listed an array of manufactured goods and bulk metals being exported to the Colony of Victoria, with a declared value of £53,700. (202 bills of lading show an actual invoice value of £68, 456, with insurance underwriting to £30,000 of all cargo). Included in the manifest is the item of “Tin hardware & cutlery £7,530”. This teaspoon is one of 482 similar items of electro-plated cutlery from the LOCH ARD site, comprising spoons and forks of various sizes but all sharing the same general shape or design and metallic composition. 49 of these pieces display a legible makers’ mark — the initials “W” and “P” placed within a raised diamond outline, which is in turn contained within a sunken crown shape — identifying the manufacturer as William Page & Co of Birmingham. An electroplater’s makers’ marks, unlike sterling silver hallmarks, are not consistent identifiers of quality or date and place of manufacture. A similar line of five impressions was usually made to impress the consumer with an implication of industry standards, but what each one actually signified was not regulated and so they varied according to the whim of the individual foundry. In this case, the maker’s marks are often obscured by sedimentary accretion or removed by corrosion after a century of submersion in the ocean. However sufficient detail has survived to indicate that these samples of electro-plated cutlery probably originated from the same consignment in the LOCH ARD’s cargo. The following descriptions of maker’s marks are drawn from 255 tea spoons, 125 dessert spoons, and 99 table forks. These marks are clearly visible in 66 instances, while the same sequence of general outlines, or depression shapes, is discernible in another 166 examples. 1. A recessed Crown containing a raised Diamond outline and the initials “W” and “P” (the recognised trademark of William Page & Co) 2. An impressed Ellipse containing a raised, pivoted, Triangle in its lower part and bearing a Resurrection Cross on its upper section (a possible dissenting church symbol reflecting religious affiliation); OR a rounded Square impression containing a raised, ‘lazy’, letter “B” (possibly mimicking sterling silver hallmark signifying city of manufacture i.e. Birmingham) 3. An impressed rounded Square filled with a raised Maltese Cross (the base metal composite of nickel silver was also known as ‘German silver’ after its Berlin inventors in 1823) 4. A recessed Circle containing a Crab or Scarab Beetle image; OR a recessed Circle containing a rotated ‘fleur de lys’ or ‘fasces’ design 5. A depressed Diamond shape enclosing a large raised letter “R” and a small raised letter “D” (mimicking the U.K. Patent Office stamp which abbreviated the term ‘registered’ to “RD”, but also included date and class of patent) Suggested trade names for William Page & Co’s particular blend of brass plating are ‘roman silver’ or ‘silverite’. This copper alloy polishes to a lustrous gold when new, discolouring to a murky grey with greenish hue when neglected. HISTORY OF THE LOCH ARD The LOCH ARD belonged to the famous Loch Line which sailed many ships from England to Australia. Built in Glasgow by Barclay, Curdle and Co. in 1873, the LOCH ARD was a three-masted square rigged iron sailing ship. The ship measured 262ft 7" (79.87m) in length, 38ft (11.58m) in width, 23ft (7m) in depth and had a gross tonnage of 1693 tons. The LOCH ARD's main mast measured a massive 150ft (45.7m) in height. LOCH ARD made three trips to Australia and one trip to Calcutta before its final voyage. LOCH ARD left England on March 2, 1878, under the command of Captain Gibbs, a newly married, 29 year old. She was bound for Melbourne with a crew of 37, plus 17 passengers and a load of cargo. The general cargo reflected the affluence of Melbourne at the time. On board were straw hats, umbrella, perfumes, clay pipes, pianos, clocks, confectionary, linen and candles, as well as a heavier load of railway irons, cement, lead and copper. There were items included that intended for display in the Melbourne International Exhibition in 1880. The voyage to Port Phillip was long but uneventful. At 3am on June 1, 1878, Captain Gibbs was expecting to see land and the passengers were becoming excited as they prepared to view their new homeland in the early morning. But LOCH ARD was running into a fog which greatly reduced visibility. Captain Gibbs was becoming anxious as there was no sign of land or the Cape Otway lighthouse. At 4am the fog lifted. A man aloft announced that he could see breakers. The sheer cliffs of Victoria's west coast came into view, and Captain Gibbs realised that the ship was much closer to them than expected. He ordered as much sail to be set as time would permit and then attempted to steer the vessel out to sea. On coming head on into the wind, the ship lost momentum, the sails fell limp and LOCH ARD's bow swung back. Gibbs then ordered the anchors to be released in an attempt to hold its position. The anchors sank some 50 fathoms - but did not hold. By this time LOCH ARD was among the breakers and the tall cliffs of Mutton Bird Island rose behind the ship. Just half a mile from the coast, the ship's bow was suddenly pulled around by the anchor. The captain tried to tack out to sea, but the ship struck a reef at the base of Mutton Bird Island, near Port Campbell. Waves broke over the ship and the top deck was loosened from the hull. The masts and rigging came crashing down knocking passengers and crew overboard. When a lifeboat was finally launched, it crashed into the side of LOCH ARD and capsized. Tom Pearce, who had launched the boat, managed to cling to its overturned hull and shelter beneath it. He drifted out to sea and then on the flood tide came into what is now known as LOCH ARD Gorge. He swam to shore, bruised and dazed, and found a cave in which to shelter. Some of the crew stayed below deck to shelter from the falling rigging but drowned when the ship slipped off the reef into deeper water. Eva Carmichael had raced onto deck to find out what was happening only to be confronted by towering cliffs looming above the stricken ship. In all the chaos, Captain Gibbs grabbed Eva and said, "If you are saved Eva, let my dear wife know that I died like a sailor". That was the last Eva Carmichael saw of the captain. She was swept off the ship by a huge wave. Eva saw Tom Pearce on a small rocky beach and yelled to attract his attention. He dived in and swam to the exhausted woman and dragged her to shore. He took her to the cave and broke open case of brandy which had washed up on the beach. He opened a bottle to revive the unconscious woman. A few hours later Tom scaled a cliff in search of help. He followed hoof prints and came by chance upon two men from nearby Glenample Station three and a half miles away. In a state of exhaustion, he told the men of the tragedy. Tom returned to the gorge while the two men rode back to the station to get help. By the time they reached LOCH ARD Gorge, it was cold and dark. The two shipwreck survivors were taken to Glenample Station to recover. Eva stayed at the station for six weeks before returning to Ireland, this time by steamship. In Melbourne, Tom Pearce received a hero's welcome. He was presented with the first gold medal of the Royal Humane Society of Victoria and a £1000 cheque from the Victorian Government. Concerts were performed to honour the young man's bravery and to raise money for those who lost family in the LOCH ARD disaster. Of the 54 crew members and passengers on board, only two survived: the apprentice, Tom Pearce and the young woman passenger, Eva Carmichael, who lost all of her family in the tragedy. Ten days after the LOCH ARD tragedy, salvage rights to the wreck were sold at auction for £2,120. Cargo valued at £3,000 was salvaged and placed on the beach, but most washed back into the sea when another storm developed. The wreck of LOCH ARD still lies at the base of Mutton Bird Island. Much of the cargo has now been salvaged and some was washed up into what is now known as LOCH ARD Gorge. Cargo and artefacts have also been illegally salvaged over many years before protective legislation was introduced. One of the most unlikely pieces of cargo to have survived the shipwreck was a Minton porcelain peacock - one of only seven in the world. The peacock was destined for the Melbourne International Exhibition in 1880. It had been well packed, which gave it adequate protection during the violent storm. Today, the Minton peacock can be seen at the Flagstaff Hill Maritime Museum in Warrnambool. From Australia's most dramatic shipwreck it has now become Australia's most valuable shipwreck artefact and is one of very few 'objects' on the Victorian State Heritage Register. The LOCH ARD shipwreck is of State significance – Victorian Heritage Register S 417. Flagstaff Hill’s collection of artefacts from LOCH ARD is significant for being one of the largest collections of artefacts from this shipwreck in Victoria. It is significant for its association with the shipwreck, which is on the Victorian Heritage Register (VHR S417). The collection is significant because of the relationship between the objects, as together they have a high potential to interpret the story of the LOCH ARD. The LOCH ARD collection is archaeologically significant as the remains of a large international passenger and cargo ship. The LOCH ARD collection is historically significant for representing aspects of Victoria’s shipping history and its potential to interpret sub-theme 1.5 of Victoria’s Framework of Historical Themes (living with natural processes). The collection is also historically significant for its association with the LOCH ARD, which was one of the worst and best known shipwrecks in Victoria’s history. Unrestored tea spoon from the wreck of the LOCH ARD. The spoon design has a flattened fiddle-back handle, with a thin stem or shank, flared collar, and elongated bowl. The spoons metallic composition is a thin layer of brass alloy which has partially corroded back to a nickel-silver base metal. Approximately 40% of original electroplating remains with some verdigris. Bowl edges are damaged. Three outlines of makers marks are visible on lower rear of handle.flagstaff hill, warrnambool, shipwrecked coast, flagstaff hill maritime museum, maritime museum, shipwreck coast, flagstaff hill maritime village, great ocean road, loch line, loch ard, captain gibbs, eva carmichael, tom pearce, glenample station, mutton bird island, loch ard gorge, electroplated cutlery, loch ard shipwreck, nickel silver, william page & co, birmingham, brass plating, makers marks -
 Flagstaff Hill Maritime Museum and Village
Spoon, circa 1878
This tea spoon is from the wreck of the LOCH ARD, a Loch Line ship of 1,693 tons which sailed from Gravesend, London, on 2 March 1878 with 17 passengers and a crew of 36 under Captain George Gibbs. “The intention was to discharge cargo in Melbourne, before returning to London via the Horn with wool and wheat”. Instead, on 1 June 1878, after 90 days at sea, she struck the sandstone cliffs of Mutton Bird Island on the south west coast of Victoria, and sank with the loss of 52 lives and all her cargo. The manifest of the LOCH ARD listed an array of manufactured goods and bulk metals being exported to the Colony of Victoria, with a declared value of £53,700. (202 bills of lading show an actual invoice value of £68, 456, with insurance underwriting to £30,000 of all cargo). Included in the manifest is the item of “Tin hardware & cutlery £7,530”. This teaspoon is one of 482 similar items of electro-plated cutlery from the LOCH ARD site, comprising spoons and forks of various sizes but all sharing the same general shape or design and metallic composition. 49 of these pieces display a legible makers’ mark — the initials “W” and “P” placed within a raised diamond outline, which is in turn contained within a sunken crown shape — identifying the manufacturer as William Page & Co of Birmingham. An electroplater’s makers’ marks, unlike sterling silver hallmarks, are not consistent identifiers of quality or date and place of manufacture. A similar line of five impressions was usually made to impress the consumer with an implication of industry standards, but what each one actually signified was not regulated and so they varied according to the whim of the individual foundry. In this case, the maker’s marks are often obscured by sedimentary accretion or removed by corrosion after a century of submersion in the ocean. However sufficient detail has survived to indicate that these samples of electro-plated cutlery probably originated from the same consignment in the LOCH ARD’s cargo. The following descriptions of maker’s marks are drawn from 255 tea spoons, 125 dessert spoons, and 99 table forks. These marks are clearly visible in 66 instances, while the same sequence of general outlines, or depression shapes, is discernible in another 166 examples. 1. A recessed Crown containing a raised Diamond outline and the initials “W” and “P” (the recognised trademark of William Page & Co) 2. An impressed Ellipse containing a raised, pivoted, Triangle in its lower part and bearing a Resurrection Cross on its upper section (a possible dissenting church symbol reflecting religious affiliation); OR a rounded Square impression containing a raised, ‘lazy’, letter “B” (possibly mimicking sterling silver hallmark signifying city of manufacture i.e. Birmingham) 3. An impressed rounded Square filled with a raised Maltese Cross (the base metal composite of nickel silver was also known as ‘German silver’ after its Berlin inventors in 1823) 4. A recessed Circle containing a Crab or Scarab Beetle image; OR a recessed Circle containing a rotated ‘fleur de lys’ or ‘fasces’ design 5. A depressed Diamond shape enclosing a large raised letter “R” and a small raised letter “D” (mimicking the U.K. Patent Office stamp which abbreviated the term ‘registered’ to “RD”, but also included date and class of patent) Suggested trade names for William Page & Co’s particular blend of brass plating are ‘roman silver’ or ‘silverite’. This copper alloy polishes to a lustrous gold when new, discolouring to a murky grey with greenish hue when neglected. HISTORY OF THE LOCH ARD The LOCH ARD belonged to the famous Loch Line which sailed many ships from England to Australia. Built in Glasgow by Barclay, Curdle and Co. in 1873, the LOCH ARD was a three-masted square rigged iron sailing ship. The ship measured 262ft 7" (79.87m) in length, 38ft (11.58m) in width, 23ft (7m) in depth and had a gross tonnage of 1693 tons. The LOCH ARD's main mast measured a massive 150ft (45.7m) in height. LOCH ARD made three trips to Australia and one trip to Calcutta before its final voyage. LOCH ARD left England on March 2, 1878, under the command of Captain Gibbs, a newly married, 29 year old. She was bound for Melbourne with a crew of 37, plus 17 passengers and a load of cargo. The general cargo reflected the affluence of Melbourne at the time. On board were straw hats, umbrella, perfumes, clay pipes, pianos, clocks, confectionary, linen and candles, as well as a heavier load of railway irons, cement, lead and copper. There were items included that intended for display in the Melbourne International Exhibition in 1880. The voyage to Port Phillip was long but uneventful. At 3am on June 1, 1878, Captain Gibbs was expecting to see land and the passengers were becoming excited as they prepared to view their new homeland in the early morning. But LOCH ARD was running into a fog which greatly reduced visibility. Captain Gibbs was becoming anxious as there was no sign of land or the Cape Otway lighthouse. At 4am the fog lifted. A man aloft announced that he could see breakers. The sheer cliffs of Victoria's west coast came into view, and Captain Gibbs realised that the ship was much closer to them than expected. He ordered as much sail to be set as time would permit and then attempted to steer the vessel out to sea. On coming head on into the wind, the ship lost momentum, the sails fell limp and LOCH ARD's bow swung back. Gibbs then ordered the anchors to be released in an attempt to hold its position. The anchors sank some 50 fathoms - but did not hold. By this time LOCH ARD was among the breakers and the tall cliffs of Mutton Bird Island rose behind the ship. Just half a mile from the coast, the ship's bow was suddenly pulled around by the anchor. The captain tried to tack out to sea, but the ship struck a reef at the base of Mutton Bird Island, near Port Campbell. Waves broke over the ship and the top deck was loosened from the hull. The masts and rigging came crashing down knocking passengers and crew overboard. When a lifeboat was finally launched, it crashed into the side of LOCH ARD and capsized. Tom Pearce, who had launched the boat, managed to cling to its overturned hull and shelter beneath it. He drifted out to sea and then on the flood tide came into what is now known as LOCH ARD Gorge. He swam to shore, bruised and dazed, and found a cave in which to shelter. Some of the crew stayed below deck to shelter from the falling rigging but drowned when the ship slipped off the reef into deeper water. Eva Carmichael had raced onto deck to find out what was happening only to be confronted by towering cliffs looming above the stricken ship. In all the chaos, Captain Gibbs grabbed Eva and said, "If you are saved Eva, let my dear wife know that I died like a sailor". That was the last Eva Carmichael saw of the captain. She was swept off the ship by a huge wave. Eva saw Tom Pearce on a small rocky beach and yelled to attract his attention. He dived in and swam to the exhausted woman and dragged her to shore. He took her to the cave and broke open case of brandy which had washed up on the beach. He opened a bottle to revive the unconscious woman. A few hours later Tom scaled a cliff in search of help. He followed hoof prints and came by chance upon two men from nearby Glenample Station three and a half miles away. In a state of exhaustion, he told the men of the tragedy. Tom returned to the gorge while the two men rode back to the station to get help. By the time they reached LOCH ARD Gorge, it was cold and dark. The two shipwreck survivors were taken to Glenample Station to recover. Eva stayed at the station for six weeks before returning to Ireland, this time by steamship. In Melbourne, Tom Pearce received a hero's welcome. He was presented with the first gold medal of the Royal Humane Society of Victoria and a £1000 cheque from the Victorian Government. Concerts were performed to honour the young man's bravery and to raise money for those who lost family in the LOCH ARD disaster. Of the 54 crew members and passengers on board, only two survived: the apprentice, Tom Pearce and the young woman passenger, Eva Carmichael, who lost all of her family in the tragedy. Ten days after the LOCH ARD tragedy, salvage rights to the wreck were sold at auction for £2,120. Cargo valued at £3,000 was salvaged and placed on the beach, but most washed back into the sea when another storm developed. The wreck of LOCH ARD still lies at the base of Mutton Bird Island. Much of the cargo has now been salvaged and some was washed up into what is now known as LOCH ARD Gorge. Cargo and artefacts have also been illegally salvaged over many years before protective legislation was introduced. One of the most unlikely pieces of cargo to have survived the shipwreck was a Minton porcelain peacock - one of only seven in the world. The peacock was destined for the Melbourne International Exhibition in 1880. It had been well packed, which gave it adequate protection during the violent storm. Today, the Minton peacock can be seen at the Flagstaff Hill Maritime Museum in Warrnambool. From Australia's most dramatic shipwreck it has now become Australia's most valuable shipwreck artefact and is one of very few 'objects' on the Victorian State Heritage Register. The LOCH ARD shipwreck is of State significance – Victorian Heritage Register S 417. Flagstaff Hill’s collection of artefacts from LOCH ARD is significant for being one of the largest collections of artefacts from this shipwreck in Victoria. It is significant for its association with the shipwreck, which is on the Victorian Heritage Register (VHR S417). The collection is significant because of the relationship between the objects, as together they have a high potential to interpret the story of the LOCH ARD. The LOCH ARD collection is archaeologically significant as the remains of a large international passenger and cargo ship. The LOCH ARD collection is historically significant for representing aspects of Victoria’s shipping history and its potential to interpret sub-theme 1.5 of Victoria’s Framework of Historical Themes (living with natural processes). The collection is also historically significant for its association with the LOCH ARD, which was one of the worst and best known shipwrecks in Victoria’s history Unrestored tea spoon from the wreck of the LOCH ARD. The spoon design has a flattened fiddle-back handle, with a thin stem or shank, flared collar, and elongated bowl. The spoons metallic composition is a thin layer of brass alloy which has partially corroded back to a nickel-silver base metal. 40% of spoon surface is encrusted with red and white sediment and 40% shows verdigris. Makers marks are obscured.flagstaff hill, warrnambool, shipwrecked coast, flagstaff hill maritime museum, maritime museum, shipwreck coast, flagstaff hill maritime village, great ocean road, loch line, loch ard, captain gibbs, eva carmichael, tom pearce, glenample station, mutton bird island, loch ard gorge, electroplated cutlery, loch ard shipwreck, nickel silver, william page & co, birmingham, brass plating, makers marks -
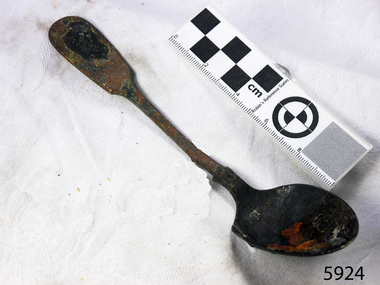 Flagstaff Hill Maritime Museum and Village
Spoon, circa 1878
This medium-sized dessert spoon is from the wreck of the LOCH ARD, a Loch Line ship of 1,693 tons which sailed from Gravesend, London, on 2 March 1878 with 17 passengers and a crew of 36 under Captain George Gibbs. “The intention was to discharge cargo in Melbourne, before returning to London via the Horn with wool and wheat”. Instead, on 1 June 1878, after 90 days at sea, she struck the sandstone cliffs of Mutton Bird Island on the south west coast of Victoria, and sank with the loss of 52 lives and all her cargo. The manifest of the LOCH ARD listed an array of manufactured goods and bulk metals being exported to the Colony of Victoria, with a declared value of £53,700. (202 bills of lading show an actual invoice value of £68, 456, with insurance underwriting to £30,000 of all cargo). Included in the manifest is the item of “Tin hardware & cutlery £7,530”. This dessert spoon is one of 482 similar items of electro-plated cutlery from the LOCH ARD site, comprising spoons and forks of various sizes but all sharing the same general shape or design and metallic composition. 49 of these pieces display a legible makers’ mark — the initials “W” and “P” placed within a raised diamond outline, which is in turn contained within a sunken crown shape — identifying the manufacturer as William Page & Co of Birmingham. An electroplater’s makers’ marks, unlike sterling silver hallmarks, are not consistent identifiers of quality or date and place of manufacture. A similar line of five impressions was usually made to impress the consumer with an implication of industry standards, but what each one actually signified was not regulated and so they varied according to the whim of the individual foundry. In this case, the maker’s marks are often obscured by sedimentary accretion or removed by corrosion after a century of submersion in the ocean. However sufficient detail has survived to indicate that these samples of electro-plated cutlery probably originated from the same consignment in the LOCH ARD’s cargo. The generally common range of marks are drawn from 255 tea spoons, 125 dessert spoons, and 99 table forks. These marks are clearly visible in 66 instances, while the same sequence of general outlines, or depression shapes, is discernible in another 166 examples. Suggested trade names for William Page & Co’s particular blend of brass plating are ‘roman silver’ or ‘silverite’. This copper alloy polishes to a lustrous gold when new, discolouring to a murky grey with greenish hue when neglected. HISTORY OF THE LOCH ARD The LOCH ARD belonged to the famous Loch Line which sailed many ships from England to Australia. Built in Glasgow by Barclay, Curdle and Co. in 1873, the LOCH ARD was a three-masted square rigged iron sailing ship. The ship measured 262ft 7" (79.87m) in length, 38ft (11.58m) in width, 23ft (7m) in depth and had a gross tonnage of 1693 tons. The LOCH ARD's main mast measured a massive 150ft (45.7m) in height. LOCH ARD made three trips to Australia and one trip to Calcutta before its final voyage. LOCH ARD left England on March 2, 1878, under the command of Captain Gibbs, a newly married, 29 year old. She was bound for Melbourne with a crew of 37, plus 17 passengers and a load of cargo. The general cargo reflected the affluence of Melbourne at the time. On board were straw hats, umbrella, perfumes, clay pipes, pianos, clocks, confectionary, linen and candles, as well as a heavier load of railway irons, cement, lead and copper. There were items included that intended for display in the Melbourne International Exhibition in 1880. The voyage to Port Phillip was long but uneventful. At 3am on June 1, 1878, Captain Gibbs was expecting to see land and the passengers were becoming excited as they prepared to view their new homeland in the early morning. But LOCH ARD was running into a fog which greatly reduced visibility. Captain Gibbs was becoming anxious as there was no sign of land or the Cape Otway lighthouse. At 4am the fog lifted. A man aloft announced that he could see breakers. The sheer cliffs of Victoria's west coast came into view, and Captain Gibbs realised that the ship was much closer to them than expected. He ordered as much sail to be set as time would permit and then attempted to steer the vessel out to sea. On coming head on into the wind, the ship lost momentum, the sails fell limp and LOCH ARD's bow swung back. Gibbs then ordered the anchors to be released in an attempt to hold its position. The anchors sank some 50 fathoms - but did not hold. By this time LOCH ARD was among the breakers and the tall cliffs of Mutton Bird Island rose behind the ship. Just half a mile from the coast, the ship's bow was suddenly pulled around by the anchor. The captain tried to tack out to sea, but the ship struck a reef at the base of Mutton Bird Island, near Port Campbell. Waves broke over the ship and the top deck was loosened from the hull. The masts and rigging came crashing down knocking passengers and crew overboard. When a lifeboat was finally launched, it crashed into the side of LOCH ARD and capsized. Tom Pearce, who had launched the boat, managed to cling to its overturned hull and shelter beneath it. He drifted out to sea and then on the flood tide came into what is now known as LOCH ARD Gorge. He swam to shore, bruised and dazed, and found a cave in which to shelter. Some of the crew stayed below deck to shelter from the falling rigging but drowned when the ship slipped off the reef into deeper water. Eva Carmichael had raced onto deck to find out what was happening only to be confronted by towering cliffs looming above the stricken ship. In all the chaos, Captain Gibbs grabbed Eva and said, "If you are saved Eva, let my dear wife know that I died like a sailor". That was the last Eva Carmichael saw of the captain. She was swept off the ship by a huge wave. Eva saw Tom Pearce on a small rocky beach and yelled to attract his attention. He dived in and swam to the exhausted woman and dragged her to shore. He took her to the cave and broke open case of brandy which had washed up on the beach. He opened a bottle to revive the unconscious woman. A few hours later Tom scaled a cliff in search of help. He followed hoof prints and came by chance upon two men from nearby Glenample Station three and a half miles away. In a state of exhaustion, he told the men of the tragedy. Tom returned to the gorge while the two men rode back to the station to get help. By the time they reached LOCH ARD Gorge, it was cold and dark. The two shipwreck survivors were taken to Glenample Station to recover. Eva stayed at the station for six weeks before returning to Ireland, this time by steamship. In Melbourne, Tom Pearce received a hero's welcome. He was presented with the first gold medal of the Royal Humane Society of Victoria and a £1000 cheque from the Victorian Government. Concerts were performed to honour the young man's bravery and to raise money for those who lost family in the LOCH ARD disaster. Of the 54 crew members and passengers on board, only two survived: the apprentice, Tom Pearce and the young woman passenger, Eva Carmichael, who lost all of her family in the tragedy. Ten days after the LOCH ARD tragedy, salvage rights to the wreck were sold at auction for £2,120. Cargo valued at £3,000 was salvaged and placed on the beach, but most washed back into the sea when another storm developed. The wreck of LOCH ARD still lies at the base of Mutton Bird Island. Much of the cargo has now been salvaged and some was washed up into what is now known as LOCH ARD Gorge. Cargo and artefacts have also been illegally salvaged over many years before protective legislation was introduced. One of the most unlikely pieces of cargo to have survived the shipwreck was a Minton porcelain peacock - one of only seven in the world. The peacock was destined for the Melbourne International Exhibition in 1880. It had been well packed, which gave it adequate protection during the violent storm. Today, the Minton peacock can be seen at the Flagstaff Hill Maritime Museum in Warrnambool. From Australia's most dramatic shipwreck it has now become Australia's shipwreck artefact and is one of very few 'objects' on the Victorian State Heritage Register most valuable. The LOCH ARD shipwreck is of State significance – Victorian Heritage Register S 417. Flagstaff Hill’s collection of artefacts from LOCH ARD is significant for being one of the largest collections of artefacts from this shipwreck in Victoria. It is significant for its association with the shipwreck, which is on the Victorian Heritage Register (VHR S417). The collection is significant because of the relationship between the objects, as together they have a high potential to interpret the story of the LOCH ARD. The LOCH ARD collection is archaeologically significant as the remains of a large international passenger and cargo ship. The LOCH ARD collection is historically significant for representing aspects of Victoria’s shipping history and its potential to interpret sub-theme 1.5 of Victoria’s Framework of Historical Themes (living with natural processes). The collection is also historically significant for its association with the LOCH ARD, which was one of the worst and best known shipwrecks in Victoria’s history. Unrestored dessert spoon from the wreck of the LOCH ARD. The spoon design has a flattened fiddle-back handle, with a thin stem or shank, flared collar, and a shallow rounded bowl. The spoons metallic composition is a thin layer of brass alloy which has partially corroded back to a nickel-silver base metal. 40% corroded plate, 50% base metal, 10% concretion. Spoon bowl is cracked and torn, and spoon stem and bowl is bent. Outlines of five makers marks - Crown, Circle, Small circle, Circle, Diamond.flagstaff hill, warrnambool, shipwrecked coast, flagstaff hill maritime museum, maritime museum, shipwreck coast, flagstaff hill maritime village, great ocean road, loch line, loch ard, captain gibbs, eva carmichael, tom pearce, glenample station, mutton bird island, loch ard gorge, electroplated cutlery, william page and co, birmingham brass plating, dessert spoons -
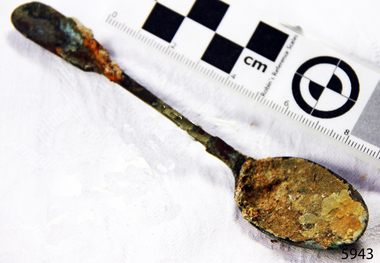 Flagstaff Hill Maritime Museum and Village
Spoon, circa 1878
This sugar spoon is from the wreck of the LOCH ARD, a Loch Line ship of 1,693 tons which sailed from Gravesend, London, on 2 March 1878 with 17 passengers and a crew of 36 under Captain George Gibbs. “The intention was to discharge cargo in Melbourne, before returning to London via the Horn with wool and wheat”. Instead, on 1 June 1878, after 90 days at sea, she struck the sandstone cliffs of Mutton Bird Island on the south west coast of Victoria, and sank with the loss of 52 lives and all her cargo. The manifest of the LOCH ARD listed an array of manufactured goods and bulk metals being exported to the Colony of Victoria, with a declared value of £53,700. (202 bills of lading show an actual invoice value of £68, 456, with insurance underwriting to £30,000 of all cargo). Included in the manifest is the item of “Tin hardware & cutlery £7,530”. This sugarspoon is one of 482 similar items of electro-plated cutlery from the LOCH ARD site, comprising spoons and forks of various sizes but all sharing the same general shape or design and metallic composition. 49 of these pieces display a legible makers’ mark — the initials “W” and “P” placed within a raised diamond outline, which is in turn contained within a sunken crown shape — identifying the manufacturer as William Page & Co of Birmingham. An electroplater’s makers’ marks, unlike sterling silver hallmarks, are not consistent identifiers of quality or date and place of manufacture. A similar line of five impressions was usually made to impress the consumer with an implication of industry standards, but what each one actually signified was not regulated and so they varied according to the whim of the individual foundry. In this case, the maker’s marks are often obscured by sedimentary accretion or removed by corrosion after a century of submersion in the ocean. However sufficient detail has survived to indicate that these samples of electro-plated cutlery probably originated from the same consignment in the LOCH ARD’s cargo. The generally common range of marks are drawn from 255 tea spoons, 125 dessert spoons, and 99 table forks. These marks are clearly visible in 66 instances, while the same sequence of general outlines, or depression shapes, is discernible in another 166 examples. Suggested trade names for William Page & Co’s particular blend of brass plating are ‘roman silver’ or ‘silverite’. This copper alloy polishes to a lustrous gold when new, discolouring to a murky grey with greenish hue when neglected. HISTORY OF THE LOCH ARD The LOCH ARD belonged to the famous Loch Line which sailed many ships from England to Australia. Built in Glasgow by Barclay, Curdle and Co. in 1873, the LOCH ARD was a three-masted square rigged iron sailing ship. The ship measured 262ft 7" (79.87m) in length, 38ft (11.58m) in width, 23ft (7m) in depth and had a gross tonnage of 1693 tons. The LOCH ARD's main mast measured a massive 150ft (45.7m) in height. LOCH ARD made three trips to Australia and one trip to Calcutta before its final voyage. LOCH ARD left England on March 2, 1878, under the command of Captain Gibbs, a newly married, 29 year old. She was bound for Melbourne with a crew of 37, plus 17 passengers and a load of cargo. The general cargo reflected the affluence of Melbourne at the time. On board were straw hats, umbrella, perfumes, clay pipes, pianos, clocks, confectionary, linen and candles, as well as a heavier load of railway irons, cement, lead and copper. There were items included that intended for display in the Melbourne International Exhibition in 1880. The voyage to Port Phillip was long but uneventful. At 3am on June 1, 1878, Captain Gibbs was expecting to see land and the passengers were becoming excited as they prepared to view their new homeland in the early morning. But LOCH ARD was running into a fog which greatly reduced visibility. Captain Gibbs was becoming anxious as there was no sign of land or the Cape Otway lighthouse. At 4am the fog lifted. A man aloft announced that he could see breakers. The sheer cliffs of Victoria's west coast came into view, and Captain Gibbs realised that the ship was much closer to them than expected. He ordered as much sail to be set as time would permit and then attempted to steer the vessel out to sea. On coming head on into the wind, the ship lost momentum, the sails fell limp and LOCH ARD's bow swung back. Gibbs then ordered the anchors to be released in an attempt to hold its position. The anchors sank some 50 fathoms - but did not hold. By this time LOCH ARD was among the breakers and the tall cliffs of Mutton Bird Island rose behind the ship. Just half a mile from the coast, the ship's bow was suddenly pulled around by the anchor. The captain tried to tack out to sea, but the ship struck a reef at the base of Mutton Bird Island, near Port Campbell. Waves broke over the ship and the top deck was loosened from the hull. The masts and rigging came crashing down knocking passengers and crew overboard. When a lifeboat was finally launched, it crashed into the side of LOCH ARD and capsized. Tom Pearce, who had launched the boat, managed to cling to its overturned hull and shelter beneath it. He drifted out to sea and then on the flood tide came into what is now known as LOCH ARD Gorge. He swam to shore, bruised and dazed, and found a cave in which to shelter. Some of the crew stayed below deck to shelter from the falling rigging but drowned when the ship slipped off the reef into deeper water. Eva Carmichael had raced onto deck to find out what was happening only to be confronted by towering cliffs looming above the stricken ship. In all the chaos, Captain Gibbs grabbed Eva and said, "If you are saved Eva, let my dear wife know that I died like a sailor". That was the last Eva Carmichael saw of the captain. She was swept off the ship by a huge wave. Eva saw Tom Pearce on a small rocky beach and yelled to attract his attention. He dived in and swam to the exhausted woman and dragged her to shore. He took her to the cave and broke open case of brandy which had washed up on the beach. He opened a bottle to revive the unconscious woman. A few hours later Tom scaled a cliff in search of help. He followed hoof prints and came by chance upon two men from nearby Glenample Station three and a half miles away. In a state of exhaustion, he told the men of the tragedy. Tom returned to the gorge while the two men rode back to the station to get help. By the time they reached LOCH ARD Gorge, it was cold and dark. The two shipwreck survivors were taken to Glenample Station to recover. Eva stayed at the station for six weeks before returning to Ireland, this time by steamship. In Melbourne, Tom Pearce received a hero's welcome. He was presented with the first gold medal of the Royal Humane Society of Victoria and a £1000 cheque from the Victorian Government. Concerts were performed to honour the young man's bravery and to raise money for those who lost family in the LOCH ARD disaster. Of the 54 crew members and passengers on board, only two survived: the apprentice, Tom Pearce and the young woman passenger, Eva Carmichael, who lost all of her family in the tragedy. Ten days after the LOCH ARD tragedy, salvage rights to the wreck were sold at auction for £2,120. Cargo valued at £3,000 was salvaged and placed on the beach, but most washed back into the sea when another storm developed. The wreck of LOCH ARD still lies at the base of Mutton Bird Island. Much of the cargo has now been salvaged and some was washed up into what is now known as LOCH ARD Gorge. Cargo and artefacts have also been illegally salvaged over many years before protective legislation was introduced. One of the most unlikely pieces of cargo to have survived the shipwreck was a Minton porcelain peacock - one of only seven in the world. The peacock was destined for the Melbourne International Exhibition in 1880. It had been well packed, which gave it adequate protection during the violent storm. Today, the Minton peacock can be seen at the Flagstaff Hill Maritime Museum in Warrnambool. From Australia's most dramatic shipwreck it has now become Australia's shipwreck artefact and is one of very few 'objects' on the Victorian State Heritage Register most valuable. The LOCH ARD shipwreck is of State significance – Victorian Heritage Register S 417. Flagstaff Hill’s collection of artefacts from LOCH ARD is significant for being one of the largest collections of artefacts from this shipwreck in Victoria. It is significant for its association with the shipwreck, which is on the Victorian Heritage Register (VHR S417). The collection is significant because of the relationship between the objects, as together they have a high potential to interpret the story of the LOCH ARD. The LOCH ARD collection is archaeologically significant as the remains of a large international passenger and cargo ship. The LOCH ARD collection is historically significant for representing aspects of Victoria’s shipping history and its potential to interpret sub-theme 1.5 of Victoria’s Framework of Historical Themes (living with natural processes). The collection is also historically significant for its association with the LOCH ARD, which was one of the worst and best known shipwrecks in Victoria’s history. Unrestored sugar spoon from the wreck of the LOCH ARD. The spoon design has a flattened fiddle-back handle, with a thin stem or shank, flared collar, and a shallow rounded bowl. The spoons metallic composition is a thin layer of brass alloy which has partially corroded back to a nickel-silver base metal. 40% concretion on spoon bowl and handle. Spoon is bent and only a small amount of the original plate remains. No visible makers marks.flagstaff hill, warrnambool, shipwrecked coast, flagstaff hill maritime museum, maritime museum, shipwreck coast, flagstaff hill maritime village, great ocean road, loch line, loch ard, captain gibbs, eva carmichael, tom pearce, glenample station, mutton bird island, loch ard gorge, electroplated cutlery, loch ard shipwreck, nickel silver, william page and co, birmingham brass plating, makers marks -
 Flagstaff Hill Maritime Museum and Village
Bearing cap, (estimated); Before The Newfield completion in 1889
This bearing cap is thought to be from a donkey winch engine, (or steam donkey, or donkey winch), which is a small secondary steam engine with a cylindrical shaped boiler. In 19th century merchant sailing a steam donkey was often used in marine applications such as to help raise and lower larger sails, load and unload cargo or to power pumps. The bearing cap could have been used on the donkey engine to hold the rod of the winch gear wheel in place, or bolted to another bearing cap around the neck on the top of the boiler’s cylinder, connecting it to the flue. The Newfield was a three-masted iron and steel barque, built in Dundee, Scotland, in 1889 by Alexander Stephen and Sons. It was owned by the Newfield Ship Company in 1890 and later that year It was registered in Liverpool to owners Brownells and Co. The Newfield left Sharpness, Scotland, on 28th May 1892 with a crew of 25 under the command of Captain George Scott and on 1st June left Liverpool. She was bound for Brisbane, Australia, with a cargo of 1850 tons of fine rock salt, the main export product of Sharpness. At about 9pm on 28th August 1892, in heavy weather, Captain Scott sighted, between heavy squalls, the Cape Otway light on the mainland of Victoria but, due to a navigational error (the ship’s chronometers were wrong), he assumed it to be the Cape Wickham light on King Island, some 40 miles south. He altered his course to the north, expecting to enter Bass Strait. The ship was now heading straight for the south west Victorian coast. At about 1:30am the Newfield ran aground on a reef about 100 yards from shore and one mile east of Curdie’s Inlet, Peterborough. The ship struck heavily three times before grounding on an inner shoal with 6 feet of water in the holds. Rough sea made the job of launching lifeboats very difficult. The first two lifeboats launched by the crew were smashed against the side of the ship and some men were crushed or swept away. The third lifeboat brought eight men to shore. It capsized when the crew tried to return it to the ship for further rescue The rescue was a difficult operation. The Port Campbell Rocket Crew arrived and fired four rocket lines, none of which connected with the ship. Peter Carmody, a local man, volunteered to swim about one mile off shore to the ship with a line to guide the fourth and final lifeboat safely to shore. He was assisted by James McKenzie and Gerard Irvine. Seventeen men survived the shipwreck but the captain and eight of his crew perished. The Newfield remained upright on the reef with sails set for a considerable time as the wind slowly ripped the canvas to shreds and the sea battered the hull to pieces. The Marine Board inquiry found the wreck was caused by a "one man style of navigation" and that the Captain had not heeded the advice of his crew. According to Jack Loney ‘… when the drama was over . . the Newfield was deserted except for the Captain’s dog and two pigs.’ Peter Carmody was awarded the Bramley-Moore medal by the Liverpool Shipwreck and Humane Society for Saving Life at Ssea, which he received by mail on January 21st 1893. The medal and a letter of congratulations were donated to Flagstaff Hill Maritime Museum by Peter Carmody’s grand-daughter Norma Bracken and her son Stuart Bracken on 25th May 2006. The Bearing Cap joins other items in the Newfield collection.Flagstaff Hill’s collection of artefacts from the Newfield is significant for its association with the shipwreck Newfield, which is listed on the Victorian Heritage Registry. The collection is significant because of the relationship between the objects. The Newfield collection is archaeologically significant as the remains of an international cargo ship. The Newfield collection is historically significant for representing aspects of Victoria’s shipping history and its association with the shipwreck.Brass bearing cap from the wreck of the sailing ship “Newfield” is possibly from a donkey winch engine. The half-circle shaped cuff with a rectangular brass block attached to the outside of each end of the half-circle. Both blocks have a round hole in their centre and are approximately the same depth and width as the cuff. Midway around the half-circle cuff is another brass block that is about twice the depth of the cuff. It appears to have been a circular shape that has been modified to match the width of the collar, having had the sides of the circle cut off to leave straights edge parallel to the edges of the cuff. In the centre of this block is another hole, and there appears to be the head of a bolt inside this hole. The bearing cap is lightly encrusted.1893, flagstaff hill, flagstaff hill maritime museum, maritime museum, warrnambool, newfield, 1892, 28 august 1892, port campbell, shipwreck, nineteenth century, ship, curdie s river, victorian shipwrecks, barque, ship wreck, 29 august 1892, 19th century, bearing cap, donkey engine, donkey winch, steam donkey -
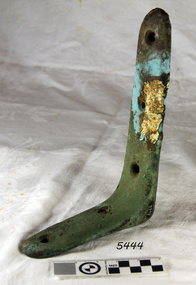 Flagstaff Hill Maritime Museum and Village
Bracket, On or before 1889, when the Newfield was built
This bracket was recovered from the wreck of the Newfield. The barque Newfield left Liverpool on 1st June 1892 with a cargo of 1850 tons of fine rock salt for Brisbane. About six weeks later the ship ran into very heavy weather approaching the Australian coast. On 28th August at about 9pm her master, Captain George Scott, observed between the heavy squalls the Cape Otway light on the mainland of Victoria, but due apparently to a navigational error (the chronometers were incorrect), he mistook it for Cape Wickham on King Island, some 40 miles south. He altered course to the north expecting to run through the western entrance of Bass Strait, but instead, at about 1:30am, the ship ran aground about about 100 yards from shore, one mile east of Curdies River. The vessel struck heavily three times before grounding on an inner shoal with six feet of water in the holds. The Newfield remained upright on the reef with sails set for a considerable time as the wind slowly ripped the canvas to shreds and the sea battered the hull to pieces. Seventeen men survived the shipwreck but the captain and eight of his crew perishedFlagstaff Hill’s collection of artefacts from the Newfield is significant for its association with the shipwreck Newfield, which is listed on the Victorian Heritage Registry. The collection is significant because of the relationship between the objects. The Newfield collection is archaeologically significant as the remains of an international cargo ship. The Newfield collection is historically significant for representing aspects of Victoria’s shipping history and its association with the shipwreck.‘L’ bracket, copper, 3 holes on one side, 2 holes on the other1893, shipwrecks, shipwrecked coast, flagstaff hill, flagstaff hill maritime museum, maritime museum, shipwrecked artefact, flagstaff hill maritime village, shipwreck coast, warrnambool, newfield, 1892, 28 august 1892, port campbell, nineteenth century, victorian shipwrecks, barque, norma bracken, peterborough, 29 august 1892, peter ronald, curdies river, bracket -
 Flagstaff Hill Maritime Museum and Village
Deck light, On or before 1889
This deck light was recovered from the wreck of the Newfield in 1973. The barque Newfield left Liverpool on 1st June 1892 with a cargo of 1850 tons of fine rock salt for Brisbane. About six weeks later the ship ran into very heavy weather approaching the Australian coast. On 28th August at about 9pm her master, Captain George Scott, observed between the heavy squalls the Cape Otway light on the mainland of Victoria, but due apparently to a navigational error (the chronometers were incorrect), he mistook it for Cape Wickham on King Island, some 40 miles south. He altered course to the north expecting to run through the western entrance of Bass Strait, but instead, at about 1:30am, the ship ran aground about about 100 yards from shore, one mile east of Curdies River. The vessel struck heavily three times before grounding on an inner shoal with six feet of water in the holds. The Newfield remained upright on the reef with sails set for a considerable time as the wind slowly ripped the canvas to shreds and the sea battered the hull to pieces. Seventeen men survived the shipwreck but the captain and eight of his crew perished. Local man Peter Carmody was recognised for risking his life in order to help save the lives of the ship's crew. In 1893 he received a letter and accompanying limited edition of the Bramley-Moore medal for saving life at sea; 1872" medal and certificate from the Liverpool Shipwreck and Humane Society. Flagstaff Hill’s collection of artefacts from the Newfield is significant for its association with the shipwreck Newfield, which is listed on the Victorian Heritage Registry. The collection is significant because of the relationship between the objects. The Newfield collection is archaeologically significant as the remains of an international cargo ship. The Newfield collection is historically significant for representing aspects of Victoria’s shipping history and its association with the shipwreckDeck light recovered from the wreck of the sailing ship “Newfield. Oval semi-spherical shape of clear thick glass.warrnambool, shipwrecked coast, flagstaff hill, flagstaff hill maritime museum, maritime museum, shipwreck coast, flagstaff hill maritime village, shipwrecked artefact, 1892, 1893, 28 august 1892, 29 august 1892, barque, curdie's river, deck light, newfield, nineteenth century, peter ronald, peterborough, port campbell, shipwrecks, victorian shipwrecks -
 Flagstaff Hill Maritime Museum and Village
Functional object - Porthole, Before June 1892, when the Newfield sailed for Brisbane
This porthole frame was recovered from the wreck of the Newfield. The barque Newfield left Liverpool on 1st June 1892 with a cargo of 1850 tons of fine rock salt for Brisbane. About six weeks later the ship ran into very heavy weather approaching the Australian coast. On 28th August at about 9pm her master, Captain George Scott, observed between the heavy squalls the Cape Otway light on the mainland of Victoria, but due apparently to a navigational error (the chronometers were incorrect), he mistook it for Cape Wickham on King Island, some 40 miles south. He altered course to the north expecting to run through the western entrance of Bass Strait, but instead, at about 1:30am, the ship ran aground about about 100 yards from shore, one mile east of Curdies River. The vessel struck heavily three times before grounding on an inner shoal with six feet of water in the holds. The Newfield remained upright on the reef with sails set for a considerable time as the wind slowly ripped the canvas to shreds and the sea battered the hull to pieces. Seventeen men survived the shipwreck but the captain and eight of his crew perished.Flagstaff Hill’s collection of artefacts from the Newfield is significant for its association with the shipwreck Newfield, which is listed on the Victorian Heritage Registry. The collection is significant because of the relationship between the objects. The Newfield collection is archaeologically significant as the remains of an international cargo ship. The Newfield collection is historically significant for representing aspects of Victoria’s shipping history and its association with the shipwreck.A porthole frame from the wreck of the Newfield. The porthole and glass are missing. It is encrusted, cracked and eroded. There are 8 retaining bolt holes with the remnants of 7 bolts remaining. On the inside are the remains of the hinge flange and the two release screws. Restored, good condition.warrnambool, shipwrecked coast, flagstaff hill, flagstaff hill maritime museum, maritime museum, shipwreck coast, flagstaff hill maritime village, shipwrecked artefact, 1892, 1893, 28 august 1892, 29 august 1892, barque, curdie's river, newfield, nineteenth century, peter ronald, peterborough, port campbell, porthole, porthole frame, shipwrecks, victorian shipwrecks -
 Flagstaff Hill Maritime Museum and Village
Steam-engine coupling, On or before 1889
This Steam Engine Coupling was recovered from the wreck of the Newfield and is thought to be part of a Donkey Engine (or steam donkey, or donkey winch), which is a small secondary steam engine with a cylindrical shaped boiler. In 19th century merchant sailing, a steam donkey was often used in marine applications such as to help raise and lower larger sails, loading and unloading cargo or for powering pumps. The barque Newfield left Liverpool on 1st June 1892 with a cargo of 1850 tons of fine rock salt for Brisbane. About six weeks later the ship ran into very heavy weather approaching the Australian coast. On 28th August at about 9pm her master, Captain George Scott, observed between the heavy squalls the Cape Otway light on the mainland of Victoria, but due apparently to a navigational error (the chronometers were incorrect), he mistook it for Cape Wickham on King Island, some 40 miles south. He altered course to the north expecting to run through the western entrance of Bass Strait, but instead, at about 1:30am, the ship ran aground about about 100 yards from shore, one mile east of Curdies River. The vessel struck heavily three times before grounding on an inner shoal with six feet of water in the holds. The Newfield remained upright on the reef with sails set for a considerable time as the wind slowly ripped the canvas to shreds and the sea battered the hull to pieces. Seventeen men survived the shipwreck but the captain and eight of his crew perished.Flagstaff Hill’s collection of artefacts from the Newfield is significant for its association with the shipwreck Newfield, which is listed on the Victorian Heritage Registry. The collection is significant because of the relationship between the objects. The Newfield collection is archaeologically significant as the remains of an international cargo ship. The Newfield collection is historically significant for representing aspects of Victoria’s shipping history and its association with the shipwreckCoupling is believed to be part of the Donkey winch's steam-engine. Threaded brass collar (with side outlet) attached to a copper pipe via a locking nut, and a four holed flange with bolts and coupling plate the other end.warrnambool, shipwrecked coast, flagstaff hill, flagstaff hill maritime museum, maritime museum, shipwreck coast, flagstaff hill maritime village, shipwrecked artefact, 1892, 1893, 28 august 1892, 29 august 1892, barque, curdie's river, donkey engine, newfield, nineteenth century, peter ronald, peterborough, port campbell, shipwrecks, steam engine coupling, steam donkey, victorian shipwrecks -
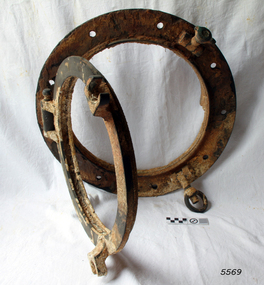 Flagstaff Hill Maritime Museum and Village
Functional object - Porthole frame, ca. 1889
This porthole and porthole cover was removed from the stern of the Newfield wreck, on the starboard side. The barque Newfield left Liverpool on 1st June 1892 with a cargo of 1850 tons of fine rock salt for Brisbane. About six weeks later the ship ran into very heavy weather approaching the Australian coast. On 28th August at about 9pm her master, Captain George Scott, observed between the heavy squalls the Cape Otway light on the mainland of Victoria, but due apparently to a navigational error (the chronometers were incorrect), he mistook it for Cape Wickham on King Island, some 40 miles south. He altered course to the north expecting to run through the western entrance of Bass Strait, but instead, at about 1:30am, the ship ran aground about about 100 yards from shore, one mile east of Curdies River. The vessel struck heavily three times before grounding on an inner shoal with six feet of water in the holds. The Newfield remained upright on the reef with sails set for a considerable time as the wind slowly ripped the canvas to shreds and the sea battered the hull to pieces. Seventeen men survived the shipwreck but the captain and eight of his crew perished.Flagstaff Hill’s collection of artefacts from the Newfield is significant for its association with the shipwreck Newfield, which is listed on the Victorian Heritage Registry. The collection is significant because of the relationship between the objects. The Newfield collection is archaeologically significant as the remains of an international cargo ship. The Newfield collection is historically significant for representing aspects of Victoria’s shipping history and its association with the shipwreckPorthole frame, including porthole and porthole cover, from the wreck of the Newfield. Porthole secured by nine bolts. It was removed from the stern of the wreck on the starboard side. there is some marine growth on the porthole. The cover still opens. warrnambool, shipwrecked coast, flagstaff hill, flagstaff hill maritime museum, maritime museum, shipwreck coast, flagstaff hill maritime village, shipwrecked artefact, 1892, 1893, 28 august 1892, 29 august 1892, barque, curdie's river, newfield, nineteenth century, peter ronald, peterborough, port campbell, porthole, porthole cover, shipwrecks, victorian shipwrecks, porthole frame -
 Flagstaff Hill Maritime Museum and Village
Functional object - Porthole, On or before 1889, when the Newfield was built
This small porthole was recovered from the wreck of the Newfield. The barque Newfield left Liverpool on 1st June 1892 with a cargo of 1850 tons of fine rock salt for Brisbane. About six weeks later the ship ran into very heavy weather approaching the Australian coast. On 28th August at about 9pm her master, Captain George Scott, observed between the heavy squalls the Cape Otway light on the mainland of Victoria, but due apparently to a navigational error (the chronometers were incorrect), he mistook it for Cape Wickham on King Island, some 40 miles south. He altered course to the north expecting to run through the western entrance of Bass Strait, but instead, at about 1:30am, the ship ran aground about about 100 yards from shore, one mile east of Curdies River. The vessel struck heavily three times before grounding on an inner shoal with six feet of water in the holds. The Newfield remained upright on the reef with sails set for a considerable time as the wind slowly ripped the canvas to shreds and the sea battered the hull to pieces. Seventeen men survived the shipwreck but the captain and eight of his crew perished.Flagstaff Hill’s collection of artefacts from the Newfield is significant for its association with the shipwreck Newfield, which is listed on the Victorian Heritage Registry. The collection is significant because of the relationship between the objects. The Newfield collection is archaeologically significant as the remains of an international cargo ship. The Newfield collection is historically significant for representing aspects of Victoria’s shipping history and its association with the shipwreckSmall porthole frame (inner), from the wreck of the Newfield. Glass missing, brass with 2 screw dogs lugs and one hinge. Restored, good condition.warrnambool, shipwrecked coast, flagstaff hill, flagstaff hill maritime museum, maritime museum, shipwreck coast, flagstaff hill maritime village, shipwrecked artefact, 1892, 1893, 28 august 1892, 29 august 1892, barque, curdie's river, newfield, nineteenth century, peter ronald, peterborough, port campbell, porthole, shipwrecks, victorian shipwrecks -
 Flagstaff Hill Maritime Museum and Village
Functional object - Valve, or before 1889
This Non-return valve was recovered from the wreck of the Newfield. Non-return valves can be used to pump water out.of a vessel The barque Newfield left Liverpool on 1st June 1892 with a cargo of 1850 tons of fine rock salt for Brisbane. About six weeks later the ship ran into very heavy weather approaching the Australian coast. On 28th August at about 9pm her master, Captain George Scott, observed between the heavy squalls the Cape Otway light on the mainland of Victoria, but due apparently to a navigational error (the chronometers were incorrect), he mistook it for Cape Wickham on King Island, some 40 miles south. He altered course to the north expecting to run through the western entrance of Bass Strait, but instead, at about 1:30am, the ship ran aground about about 100 yards from shore, one mile east of Curdies River. The vessel struck heavily three times before grounding on an inner shoal with six feet of water in the holds. The Newfield remained upright on the reef with sails set for a considerable time as the wind slowly ripped the canvas to shreds and the sea battered the hull to pieces. Seventeen men survived the shipwreck but the captain and eight of his crew perished.Flagstaff Hill’s collection of artefacts from the Newfield is significant for its association with the shipwreck Newfield, which is listed on the Victorian Heritage Registry. The collection is significant because of the relationship between the objects. The Newfield collection is archaeologically significant as the remains of an international cargo ship. The Newfield collection is historically significant for representing aspects of Victoria’s shipping history and its association with the shipwreck.A non-return valve used to connect to a hose on a bilge pump on a vessel. This valve is from the ship Newfield and was used to pump water out of the vessel. warrnambool, shipwrecked coast, flagstaff hill, flagstaff hill maritime museum, maritime museum, shipwreck coast, flagstaff hill maritime village, shipwrecked artefact, 1892, 1893, 28 august 1892, 29 august 1892, barque, curdies river, newfield, nineteenth century, non return valve, peter ronald, peterborough, port campbell, shipwrecks, victorian shipwrecks, valve, bilge pump -
 Flagstaff Hill Maritime Museum and Village
Furniture - Door, 1871 or earlier
The wooden door was salvaged from the wreck of the sailing ship Eric the Red, which was a wooden, three masted clipper ship. Eric the Red was the largest full-rigged ship built at Bath, Maine, USA in 1871, having had a 1,580 tons register. She was built and registered by Arthur Sewall, later to become the partnership E. & A. Sewall, the 51st ship built by this company. The annually-published List of Merchant Vessels of the U.S. shows Bath was still the home port of Eric the Red in 1880. The vessel was named after the Viking discoverer, Eric the Red, who was the first European to reach the shores of North America (in 980AD). The ship Eric the Red at first traded in coal between America and Britain, and later traded in guano nitrates from South America. In 1879 she was re-metalled and was in first class condition. On 10th June 1880 (some records say 12th June) Eric the Red departed New York for Melbourne and then Sydney. She had been commissioned by American trade representatives to carry a special cargo of 500 exhibits (1400 tons) – about a quarter to a third of America’s total exhibits - from America for the U.S.A. pavilion at Melbourne’s first International Exhibition. The exhibits included furniture, ironmongery, wines, chemicals, dental and surgical instruments, paper, cages, bronze lamp trimmings, axles, stamped ware, astronomical and time globes, samples of corn and the choicest of leaf tobacco. Other general cargo included merchandise such as cases of kerosene and turpentine, brooms, Bristol's Sarsaparilla, Wheeler and Wilson sewing machines, Wheeler’s thresher machine, axe handles and tools, cases of silver plate, toys, pianos and organs, carriages and Yankee notions. The Eric the Red left New York under the command of Captain Z. Allen (or some records say Captain Jacques Allen) and 24 other crew including the owner’s son third mate Ned Sewall. There were 2 saloon passengers also. The ship had been sailing for an uneventful 85 days and the voyage was almost at its end. On 4th September 1880 the Eric the Red approached Cape Otway with a moderate north-west wind and hazy and overcast atmosphere. Around 1:30am Captain Allen sighted the Cape Otway light and was keeping the ship 5-6 miles offshore to stay clear of the hazardous Otway Reef. However he had badly misjudged his position. The ship hit the Otway Reef about 2 miles out to sea, south west of the Cape Otway light station. He ordered the wheel to be put ‘hard up’ thinking that she might float off the reef. A heavy sea knocked the man away from the wheel, broke the wheel ropes and carried away the rudder. The sea swamped the lifeboats. The mizzenmast fell, with all of its rigging, then the mainmast also fell and the ship broke in two. Some said that the passenger Vaughan, who was travelling for his health and not very strong, was washed overboard and never seen again. The ship started breaking up. The forward house came adrift with three of the crew on it as well as a longboat, which the men succeeded in launching and keeping afloat by continually bailing with their sea boots. The captain, the third mate (the owner’s son) and others clung to the mizzenmast in the sea. Then the owner’s son was washed away off the mast. Within 10 minutes the rest of the ship was in pieces, completely wrecked, with cargo and wreckage floating in the sea. The captain encouraged the second mate to swim with him to the deckhouse where there were other crew but the second mate wouldn’t go with him. Eventually the Captain made it to the deckhouse and the men pulled him up. At about 4:30am the group of men on the deckhouse saw the lights of a steamer and called for help. At the same time they noticed the second mate and the other man had drifted nearby, still on the spur, and pulled them both onto the wreck. The coastal steamer Dawn was returning to Warrnambool from Melbourne, its sailing time different to its usual schedule. Captain Jones sent out two life boats, and fired off rockets and blue lights to illuminate the area. They picked up the three survivors who were in the long boat from Eric the Red. Two men were picked up out of the water, one being the owner’s son who was clinging to floating kerosene boxes. At daylight the Dawn then rescued the 18 men from the floating portion of the deckhouse, which had drifted about 4 miles from where they’d struck the reef. Shortly after the rescue the deckhouse drifted onto breakers and was thrown onto rocks at Point Franklin, about 2 miles east of Cape Otway. Captain Jones had signalled to Cape Otway lighthouse the number of the Eric the Red and later signalled that there was a wreck at Otway Reef but there was no response from the lighthouse. The captain and crew of the Dawn spent several more hours searching unsuccessfully for more survivors, even going back as far as Apollo Bay. On board the Dawn the exhausted men received care and attention to their needs and wants, including much needed clothing. Captain Allen was amongst the 23 battered and injured men who were rescued and later taken to Warrnambool for care. Warrnambool’s mayor and town clerk offered them all hospitality, the three badly injured men going to the hospital for care and others to the Olive Branch Hotel, then on to Melbourne. Captain Allen’s leg injury prevented him from going ashore so he and three other men travelled on the Dawn to Portland. They were met by the mayor who also treated them all with great kindness. Captain Allen took the train back to Melbourne then returned to America. Those saved were Captain Z. Allen (or Jacques Allen), J. Darcy chief mate, James F. Lawrence second mate, Ned Sewall third mate and owner’s son, John French the cook, C. Nelson sail maker, Clarence W. New passenger, and the able seamen Dickenson, J. Black, Denis White, C. Herbert, C. Thompson, A. Brooks, D. Wilson, J. Ellis, Q. Thompson, C. Newman, W. Paul, J. Davis, M. Horenleng, J. Ogduff, T. W. Drew, R. Richardson. Four men had lost their lives; three of them were crew (Gus Dahlgreen ship’s carpenter, H. Ackman steward, who drowned in his cabin, and George Silver seaman) and one a passenger (J. B. Vaughan). The body of one of them had been found washed up at Cape Otway and was later buried in the lighthouse cemetery; another body was seen on an inaccessible ledge. Twelve months later the second mate James F. Lawrence, from Nova Scotia, passed away in the Warrnambool district; an obituary was displayed in the local paper. The captain and crew of the Dawn were recognised by the United States Government in July 1881 for their humane efforts, being thanked and presented with substantial monetary rewards, medals and gifts. Neither the ship, nor its cargo, was insured. The ship was worth about £15,000 and the cargo was reportedly worth £40,000; only about £2,000 worth had been recovered. Cargo and wreckage washed up at Apollo Bay, Peterborough, Port Campbell, Western Port and according to some reports, even as far away as the beaches of New Zealand. The day after the wreck the government steam ship Pharos was sent from Queenscliff to clear the shipping lanes of debris that could be a danger to ships. The large midship deckhouse of the ship was found floating in a calm sea near Henty Reef. Items such as an American chair, a ladder and a nest of boxes were all on top of the deckhouse. As it was so large and could cause danger to passing ships, Captain Payne had the deckhouse towed towards the shore just beyond Apollo Bay. Between Apollo Bay and Blanket Bay the captain and crew of Pharos collected Wheeler and Wilson sewing machines, nests of boxes, bottles of Bristol’s sarsaparilla, pieces of common American chairs, axe handles, a Wheelers’ Patent thresher and a sailor’s trunk with the words “A. James” on the front. A ship’s flag-board bearing the words “Eric the Red” was found on the deckhouse; finally those on board the Pharos had the name of the wrecked vessel. During this operation Pharos came across the government steamer Victoria and also a steamer S.S. Otway, both of which were picking up flotsam and wreckage. A whole side of the hull and three large pieces of the other side of the hull, with some of the copper sheathing stripped off, had floated on to Point Franklin. Some of the vessels yards and portions of her masts were on shore. The pieces of canvas attached to the yards and masts confirmed that the vessel had been under sail. The beach there was piled with debris several feet high. There were many cases of Diamond Oil kerosene, labelled R. W. Cameron and Company, New York. There were also many large planks of red pine, portions of a small white boat and a large, well-used oar. Other items found ashore included sewing machines (some consigned to ‘Long and Co.”) and notions, axe and scythe handles, hay forks, wooden pegs, rolls of wire (some branded “T.S” and Co, Melbourne”), kegs of nails branded “A.T. and Co.” from the factory of A. Field and Son, Taunton, Massachusetts, croquet balls and mallets, buggy fittings, rat traps, perfumery, cutlery and Douay Bibles, clocks, bicycles, chairs, a fly wheel, a cooking stove, timber, boxes, pianos, organs and a ladder. (Wooden clothes pegs drifted in for many years). There seemed to be no personal luggage or clothing. The Pharos encountered a long line, about one and a half miles, of floating wreckage about 10 miles off land, south east of Cape Otway, and in some places about 40 feet wide. It seemed that more than half of it was from Eric the Red. The ship’s crew rescued 3 cases that were for the Melbourne Exhibition and other items from amongst the debris. There were also chairs, doors, musical instruments, washing boards, nests of trunks and fly catchers floating in the sea. Most of the goods were saturated and smelt of kerosene. A section of the hull lies buried in the sand at Parker River Beach. An anchor with chain is embedded in the rocks east of Point Franklin and a second anchor, thought to be from Eric the Red, is on display at the Cape Otway light station. (There is a photograph of a life belt on the verandah of Rivernook Guest House in Princetown with the words “ERIC THE RED / BOSTON”. This is rather a mystery as the ship was registered in Bath, Maine, USA.) Parts of the ship are on display at Bimbi Park Caravan Park and at Apollo Bay Museum. Flagstaff Hill Maritime Village also has part of the helm (steering wheel), a carved wooden sword (said to be the only remaining portion of the ship’s figurehead; further research is currently being carried out), a door, a metal rod and samples of wood. Much of the wreckage was recovered by the local residents before police and other authorities arrived at the scene. Looters went to great effort to salvage goods, being lowered down the high cliff faces to areas with little or no beach to collect items from the wreckage, their mates above watching out for dangerous waves. A Tasmanian newspaper reports on a court case in Stawell, Victoria, noting a man who was caught 2 months later selling tobacco from the wreckage of Eric the Red. Some of the silverware is still treasured by descendants of Mr Mackenzie who was given these items by officials for his help in securing the cargo. The gifts included silver coffee and tea pots, half a dozen silver serviette rings and two sewing machines. The wreck and cargo were sold to a Melbourne man who salvaged a quantity of high quality tobacco and dental and surgical instruments. Timbers from the ship were salvaged and used in the construction of houses and sheds around Apollo Bay, including a guest house, Milford House (since burnt down in bushfires), which had furniture, fittings and timber on the dining room floor from the ship. A 39.7 foot long trading ketch, the Apollo, was also built from its timbers by Mr Burgess in 1883 and subsequently used in Tasmanian waters. It was the first attempt at ship building in Apollo bay. In 1881 a red light was installed about 300 feet above sea level at the base of the Cape Otway lighthouse to warn ships when they were too close to shore; It would not be visible unless a ship came within 3 miles from it. This has proved to be an effective warning. The State Library of Victoria has a lithograph in its collection depicting the steamer Dawn and the shipwrecked men, titled. "Wreck of the ship Eric the Red, Cape Otway: rescue of the crew by the Dawn". “The Eric the Red is historically significant as one of Victoria's major 19th century shipwrecks. (Heritage Victoria Eric the Red; HV ID 239) The wreck led to the provision of an additional warning light placed below the Cape Otway lighthouse to alert mariners to the location of Otway Reef. The site is archaeologically significant for its remains of a large and varied cargo and ship's fittings being scattered over a wide area. The site is recreationally and aesthetically significant as it is one of the few sites along this coast where tourists can visit identifiable remains of a large wooden shipwreck, and for its location set against the background of Cape Otway, Bass Strait, and the Cape Otway lighthouse.“ (Victorian Heritage Database Registration Number S239, Official Number 8745 USA) Door from the wreck of the ship Eric the Red. The wooden singular rectangular door includes three insert panel sections. The top section is square shaped and is missing its panel or glass. The centre timber panel is about a third of the height of the top panel and the bottom timber panel is approximately equal in height to the total height of the two upper panels. The door fastenings include both a metal door latch and traditional door bolt. They are both attached to the front right hand side of the door. The bolt is just below the top panel, and the door latch is in approximately the centre of that side. The door latch has a round mark where a handle could have been attached. The wood of the door has scraping marks in a semi-circle around the door latch where the latch has swung around on its one remaining fastening and grazed the surface. There is a metal hinge at the top section of the door on the opposite side to the latch. The painted surface has been scraped back to expose the wood. The door is shorter than the average height of a person. On the reverse of the door there are lines on the panels, just inside their edges, is what appears to be pencil. The door is not aligned straight but is skew to centre.warrnambool, flagstaff hill, flagstaff hill maritime village, maritime museum, shipwreck coast, great ocean road, shipwreck artefact, eric the red, jaques allen, sewall, 1880, melbourne exhibition 1880, cape otway, otway reef, victorian shipwreck, bass strait, eric-the-red, door -
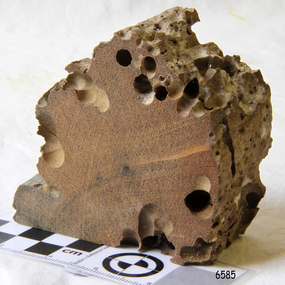 Flagstaff Hill Maritime Museum and Village
Wood Sample, about 1871
This piece of timber from the ship Eric the Red has been eaten through by the marine animals called Teredo Worms, sometimes called sea worms or ‘termites of the sea’. The worms bore holes into wood that is immersed in sea water and bacteria inside the worms digest the wood. Shipbuilders tried to prevent this problem by using coatings of tar, wax, lead or pitch. In the 18th and 19th centuries the outside of their ships were sheathed in copper or a combination of copper and zinc (called Muntz metal) and would be re-metalled periodically to ensure the sheathing would remain effective. In more recent times the ships are protected with a toxic coating. The American ship Eric the Red was a wooden, three masted clipper ship. She had 1,580 tons register and was the largest full-rigged ship built at Bath, Maine, USA in 1871. She was built and registered by Arthur Sewall, later to become the partnership E. & A. Sewall, the 51st ship built by this company. The annually-published List of Merchant Vessels of the U.S. shows Bath was still the home port of Eric the Red in 1880. The vessel was named after the Viking discoverer, Eric ‘the Red-haired’ Thorvaldsson , who was the first European to reach the shores of North America (in 980AD). The ship Eric the Red at first traded in coal between America and Britain, and later traded in guano nitrates from South America. In 1879 she was re-metalled and was in first class condition. On 10th June 1880 (some records say 12th June) Eric the Red departed New York for Melbourne and then Sydney. She had been commissioned by American trade representatives to carry a special cargo of 500 exhibits (1400 tons) – about a quarter to a third of America’s total exhibits - for the U.S.A. pavilion at Melbourne’s first International Exhibition. The exhibits included furniture, ironmongery, wines, chemicals, dental and surgical instruments, paper, cages, bronze lamp trimmings, axles, stamped ware, astronomical and time globes, samples of corn and the choicest of leaf tobacco. Other general cargo included merchandise such as cases of kerosene and turpentine, brooms, Bristol's Sarsaparilla, Wheeler and Wilson sewing machines, Wheeler’s thresher machine, axe handles and tools, cases of silver plate, toys, pianos and organs, carriages and Yankee notions. The Eric the Red left New York under the command of Captain Zaccheus Allen (or some records say Captain Jacques Allen) and 24 other crew including the owner’s son third mate Ned Sewall. There were also 2 saloon passengers on board. The ship had been sailing for an uneventful 85 days and the voyage was almost at its end. As Eric the Red approached Cape Otway there was a moderate north-west wind and hazy and overcast atmosphere. On 4th September 1880 at about 1:30am Captain Allen sighted the Cape Otway light and was keeping the ship 5-6 miles offshore to stay clear of the hazardous Otway Reef. However he had badly misjudged his position. The ship hit the Otway Reef about 2 miles out to sea, south west of the Cape Otway light station. Captain Allen ordered the wheel to be put ‘hard up’ thinking that she might float off the reef. The sea knocked the helmsman away from the wheel, broke the wheel ropes and carried away the rudder. The lifeboats were swamped, the mizzenmast fell, with all of its rigging, then the mainmast also fell and the ship broke in two. Some said that the passenger Vaughan, who was travelling for his health and not very strong, was washed overboard and never seen again. The ship started breaking up. The forward house came adrift with three of the crew on it as well as a longboat, which the men succeeded in launching and keeping afloat by continually bailing with their sea boots. The captain, the third mate (the owner’s son) and others clung to the mizzenmast in the sea. Then the owner’s son was washed away off the mast. Within 10 minutes the rest of the ship was in pieces, completely wrecked, with cargo and wreckage floating in the sea. The captain encouraged the second mate to swim with him to the deckhouse where there were other crew but the second mate wouldn’t go with him. Eventually the Captain made it to the deckhouse and the men pulled him up. At about 4:30am the group of men on the deckhouse saw the lights of a steamer and called for help. At the same time they noticed the second mate and the other man had drifted nearby, still on the spur, and pulled them both onto the wreck. The coastal steamer SS Dawn was returning to Warrnambool from Melbourne, its sailing time different to its usual schedule. She was built in 1876 and bought by the Portland and Belfast Steam Navigation Co. in 1877. At the time of this journey she was commanded by Captain Jones, and was sailing between Melbourne and Portland via Warrnambool. The provedore of the Dawn, Benjamin Lear, heard cries of distress coming through the portholes of the saloon. He gave the alarm and the engines were stopped. Cries could be heard clearly, coming from the land. Captain Jones sent out crew in two boats, and fired off rockets and blue lights to illuminate the area. They picked up the three survivors who were in the long boat from Eric the Red. Two men were picked up out of the water, one being the owner’s son who was clinging to floating kerosene boxes. At daylight the Dawn then rescued the 18 men from the floating portion of the deckhouse, which had drifted about 4 miles from where they’d struck the reef. Shortly after the rescue the deckhouse drifted onto breakers and was thrown onto rocks at Point Franklin, about 2 miles east of Cape Otway. Captain Jones had signalled to Cape Otway lighthouse the number of the Eric the Red and later signalled that there was a wreck at Otway Reef but there was no response from the lighthouse. The captain and crew of the Dawn spent several more hours searching unsuccessfully for more survivors, even going back as far as Apollo Bay. On board the Dawn the exhausted men received care and attention to their needs and wants, including much needed clothing. Captain Allen was amongst the 23 battered and injured men who were rescued and later taken to Warrnambool for care. Warrnambool’s mayor and town clerk offered them all hospitality, the three badly injured men going to the hospital for care and others to the Olive Branch Hotel, then on to Melbourne. Captain Allen’s leg injury prevented him from going ashore so he and three other men travelled on the Dawn to Portland. They were met by the mayor who also treated them all with great kindness. Captain Allen took the train back to Melbourne then returned to America. Those saved were Captain Zaccheus Allen (or Jacques Allen), J. Darcy chief mate, James F. Lawrence second mate, Ned Sewall third mate and owner’s son, John French the cook, C. Nelson sail maker, Clarence W. New passenger, and the able seamen Dickenson, J. Black, Denis White, C. Herbert, C. Thompson, A. Brooks, D. Wilson, J. Ellis, Q. Thompson, C. Newman, W. Paul, J. Davis, M. Horenleng, J. Ogduff, T. W. Drew, R. Richardson. Four men had lost their lives; three of them were crew (Gus Dahlgreen ship’s carpenter, H. Ackman steward, who drowned in his cabin, and George Silver seaman) and one a passenger (J. B. Vaughan). The body of one of them had been found washed up at Cape Otway and was later buried in the lighthouse cemetery; another body was seen on an inaccessible ledge. Twelve months later the second mate James F. Lawrence, from Nova Scotia, passed away in the Warrnambool district; an obituary was displayed in the local paper. Neither the ship, nor its cargo, was insured. The ship was worth about £15,000 and the cargo was reportedly worth £40,000; only about £2,000 worth had been recovered. Cargo and wreckage washed up at Apollo Bay, Peterborough, Port Campbell, Western Port and according to some reports, even as far away as the beaches of New Zealand. The day after the wreck the government steam ship Pharos was sent from Queenscliff to clear the shipping lanes of debris that could be a danger to ships. The large midship deckhouse of the ship was found floating in a calm sea near Henty Reef. Items such as an American chair, a ladder and a nest of boxes were all on top of the deckhouse. As it was so large and could cause danger to passing ships, Captain Payne had the deckhouse towed towards the shore just beyond Apollo Bay. Between Apollo Bay and Blanket Bay the captain and crew of Pharos collected Wheeler and Wilson sewing machines, nests of boxes, bottles of Bristol’s sarsaparilla, pieces of common American chairs, axe handles, a Wheelers’ Patent thresher and a sailor’s trunk with the words “A. James” on the front. A ship’s flag-board bearing the words “Eric the Red” was found on the deckhouse; finally those on board the Pharos had the name of the wrecked vessel. During this operation Pharos came across the government steamer Victoria and also a steamer S.S. Otway, both of which were picking up flotsam and wreckage. A whole side of the hull and three large pieces of the other side of the hull, with some of the copper sheathing stripped off, had floated on to Point Franklin. Some of the vessels yards and portions of her masts were on shore. The pieces of canvas attached to the yards and masts confirmed that the vessel had been under sail. The beach there was piled with debris several feet high. There were many cases of Diamond Oil kerosene, labelled R. W. Cameron and Company, New York. There were also many large planks of red pine, portions of a small white boat and a large, well-used oar. Other items found ashore included sewing machines (some consigned to ‘Long and Co.”) and notions, axe and scythe handles, hay forks, wooden pegs, rolls of wire (some branded “T.S” and Co, Melbourne”), kegs of nails branded “A.T. and Co.” from the factory of A. Field and Son, Taunton, Massachusetts, croquet balls and mallets, buggy fittings, rat traps, perfumery, cutlery and Douay Bibles, clocks, bicycles, chairs, a fly wheel, a cooking stove, timber, boxes, pianos, organs and a ladder. (Wooden clothes pegs drifted in for many years). There seemed to be no personal luggage or clothing. The Pharos encountered a long line, about one and a half miles, of floating wreckage about 10 miles off land, south east of Cape Otway, and in some places about 40 feet wide. It seemed that more than half of it was from Eric the Red. The ship’s crew rescued 3 cases that were for the Melbourne Exhibition and other items from amongst the debris. There were also chairs, doors, musical instruments, washing boards, nests of trunks and fly catchers floating in the sea. Most of the goods were saturated and smelt of kerosene. A section of the hull lies buried in the sand at Parker River Beach. An anchor with chain is embedded in the rocks east of Point Franklin and a second anchor, thought to be from Eric the Red, is on display at the Cape Otway light station. (There is a photograph of a life belt on the verandah of Rivernook Guest House in Princetown with the words “ERIC THE RED / BOSTON”. This is rather a mystery as the ship was registered in Bath, Maine, USA.) Parts of the ship are on display at Bimbi Park Caravan Park and at Apollo Bay Museum. Flagstaff Hill Maritime Village also has part of the helm (steering wheel), a carved wooden sword (said to be the only remaining portion of the ship’s figurehead; further research is currently being carried out), a door, a metal rod, several samples of wood and a medal for bravery, awarded to Nelson Johnson, a crew member of the S.S. Dawn by the U.S. President, for the rescue of the crew. Much of the wreckage was recovered by the local residents before police and other authorities arrived at the scene. Looters went to great effort to salvage goods, being lowered down the high cliff faces to areas with little or no beach to collect items from the wreckage, their mates above watching out for dangerous waves. A Tasmanian newspaper reports on a court case in Stawell, Victoria, noting a man who was caught 2 months later selling tobacco from the wreckage of Eric the Red. Some of the silverware is still treasured by descendants of Mr Mackenzie who was given these items by officials for his help in securing the cargo. The gifts included silver coffee and tea pots, half a dozen silver serviette rings and two sewing machines. A Mr G.W. Black has in his possession a medal and a purse that were awarded to his father, another Dawn crew member who was part of the rescue team. The medal is inscribed and named “To John Black ….” (from “Shipwrecks” by Margaret E. Mackenzie, 3rd edition, published 1964). The wreck and cargo were sold to a Melbourne man who salvaged a quantity of high quality tobacco and dental and surgical instruments. Timbers from the ship were salvaged and used in the construction of houses and sheds around Apollo Bay, including a guest house, Milford House (since burnt down in bushfires), which had furniture, fittings and timber on the dining room floor from the ship. A 39.7 foot long trading ketch, the Apollo, was also built from its timbers by Mr Burgess in 1883 and subsequently used in Tasmanian waters. It was the first attempt at ship building in Apollo bay. In 1881 a red light was installed about 300 feet above sea level at the base of the Cape Otway lighthouse to warn ships when they were too close to shore; It would not be visible unless a ship came within 3 miles from it. This has proved to be an effective warning. Nelson Johnson, recipient of the medal for bravery, married Elizabeth Howard in 1881 and they had 10 children. They lived in South Melbourne, Victoria. Nelson died in 1922 in Fitzroy Victoria, age 66. In 1895 the owners of the S.S. Dawn, the Portland and Belfast Steam Navigation Co., wound up and sold out to the Belfast Company who took over the Dawn for one year before selling her to Howard Smith. She was condemned and sunk in Suva in 1928. The State Library of Victoria has a lithograph in its collection depicting the steamer Dawn and the shipwrecked men, titled. "Wreck of the ship Eric the Red, Cape Otway: rescue of the crew by the Dawn".The wood (timber) sample is listed on the Collections Australia Database, Heritage Victoria, number 239 00010 A “The Eric the Red is historically significant as one of Victoria's major 19th century shipwrecks. (Heritage Victoria Eric the Red; HV ID 239) The wreck led to the provision of an additional warning light placed below the Cape Otway lighthouse to alert mariners to the location of Otway Reef. The site is archaeologically significant for its remains of a large and varied cargo and ship's fittings being scattered over a wide area. The site is recreationally and aesthetically significant as it is one of the few sites along this coast where tourists can visit identifiable remains of a large wooden shipwreck, and for its location set against the background of Cape Otway, Bass Strait, and the Cape Otway lighthouse.“ (Victorian Heritage Database Registration Number S239, Official Number 8745 USA) Wood sample from the wreck of the ship Eric the Red. Triangular shaped, full of sea worm (Teredo worm) holes. The wood is dark in colour and is very light in weight.flagstaff hill, warrnambool, shipwrecked-coast, flagstaff-hill, flagstaff-hill-maritime-museum, maritime-museum, shipwreck-coast, flagstaff-hill-maritime-village, shipwreck-artefact, eric-the-red, zaccheus-allen, sewall, 1880, melbourne-exhibition, cape-otway, otway-reef, wood-sample, s.s.-dawn